See It and Say It Flip Flop Spanish


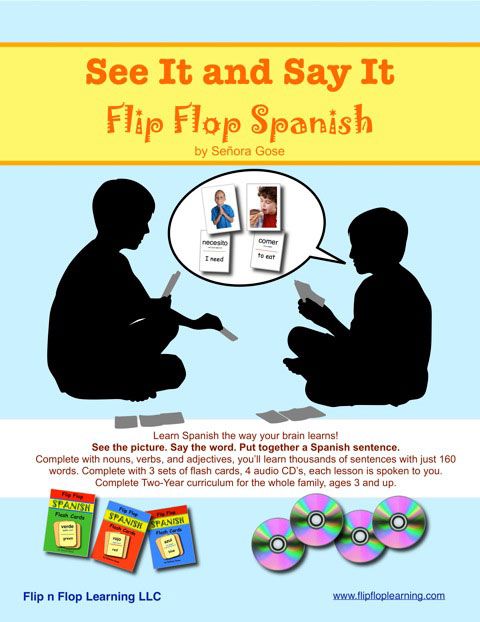
Have you wanted to include spanish in your homeschool schedule but are intimidated by complex programs?? Then check out See It and Say It Flip Flop Spanish from Flip Flop Learning. We recently had the chance to review this product with all my kids and were quite pleased with the results.


The first thing we noticed when opening the package was how organized everything was laid out with clear, easy-to-follow instructions that said precisely how to use this curriculum. No paging through a book to figure it out! The lesson pages were already hole punched ready to put into a 3 ring binder. In fact, if your binder had the outside clear pockets, included was a cover page, a piece for the spine & a back page to put in!


After we got the pages in the binder, we put the CD in the computer to play and opened the book to the first lesson. The lesson pages & CD walk you through step by step of how to best use this program. There is no prep work at all!  It is set up to be a 2 year curriculum, doing 1 lesson per week (that you repeat 3 times during that week) though you can go at your own pace and move through it quicker if your children are grasping it well. It is recommended to use the CD lesson for the first 2 lessons each week then going on your own using the curriculum as a guide for the 3rd lesson.

Along with the actual instruction book are flashcards that have colorful pictures on one side and the spanish & english words on the other side. Also included is a white board paddle and dry erase marker to play spanish pictionary with (which was a huge hit with my kids!)

From the very 1st lesson, you start assembling simple sentences such as "Me gusta el helado" (I like ice cream). Not only do you have immersion with this curriculum listening to Senora Gose's easy-to-understand voice, you also have a picture for each word so it really helps reinforce the word both visually & audibly at the same time. The curriculum encourages you to flip the word over & flop it down as you say it but with teaching several kids at a time we didn't do this. I had the kids sit in a circle & point to the words instead.

Older kids are encouraged to write sentences using the words they have learned which is what my older ones have done. Each time they were presented with new words, they wrote them in their notebook then later in the week they wrote sentences using these words which really helped reinforce what they were learning.

They loved playing pictionary using the white board paddle. We would put the flashcards in a bowl and whose ever turn it was, picked a random card and had to draw it for the others to guess it in spanish. Whoever said the word correctly in spanish won the card.


Other activities that we did were playing charades and speed rounds where the word was said on the CD and they had to race to point to the word. There are also other suggested activities listed on the website.

This program is recommended for ages 3 and up. What impressed me was that due to the CD having you repeat words and use the flashcards at the same time, my 2 year old was attempting to say the words. Even more impressive was when shown flashcards and I would say the spanish word, she could point to the correct picture!!!

My kids beg almost every day to do this program (which takes at most 15 minutes a day). I love the simplicity of it yet how much they are learning daily.

The full program is $99.95 (with free shipping) and includes:
45 lessons ready to put into a 3 ring binder
4 audio CDs in a plastic sheet you can put in the binder
3 decks of flashcards that have colorful pictures & the english/spanish words
1 white board paddle
1 dry eraser marker
2 plastic sheets you can insert the flashcards in to keep sentences in place

Definitely a wonderful program that you can use with any age group all at one time!

Photobucket

Baby Parade! (give me your ideas)

Every fall, our local town has a fair where the streets are blocked off for a few days. Lots of overpriced  games & rides as well as the many food stands can be found here. There are also lots of categories where you can enter items such as baked or home-canned goods, produce you've grown, photos, sewing items, etc to be judged and win a monetary prize.

The part I look forward to the most is the baby parade. I had the kids involved for several years until they got too old for it (age 6). Last year I was thrilled to finally be able to participate again with Olivia. She got 2nd place in her category! (the chicken costume). We aren't required to dress up with our child but it does add a certain element to it so I have tried at times to dress up with them. Another thing that gives us more points is handmaking the childs costume. And in the pictures below, I have made them all myself (except my chicken costume, which I owned from working as one along with my kids several years ago).


In fact, the one year we were asked to participate in the Mummer's Day Parade in Philadelphia on New Year's Day!! We even placed winning $100 & a trophy!


And just for laughs, here's a pic of the kids & when we spent a week working as "chickens" (yes I made their costumes). We also worked as the above clowns as well.

All that to say, I wanted to see what suggestion you would have for Olivia & Ava this year! There are different categories such as decorating a wagon with them in it (which we have a wagon), best characterization, cutest sibling group and best dressed walking are some I would consider. Most of the time we did best dressed walking. So comment below or message me with your suggestions!!

The Presidential Game


We are a game loving family. Ever since the kids were younger, we've slowly been building up our game closet so when The Presidential Game came up for review, we didn't hesitate to request it. 

I'll be honest, I wasn't sure what to expect with a game that is solely based on acquiring electoral votes to win the presidency. I was afraid I'd be pulling my kids teeth to play this for the review. Boy was I blown away! Both the kids & my husband spent many hours over the last 6 weeks playing this because they wanted to!


The game comes with a sturdy, colorful game board, red & blue dice, red & blue chips, score sheet & political cards (as well as some blank ones for you to write your own). This game is for ages 11 & up but if you have younger children, they can pair up with the older ones to play. You have to have a minimum of 2 players but you can have as many people as you want to play as you split into 2 teams, the democrats & republicans. Just as an added side note, it doesn't matter which side of the fence you sit on for your real life political party, this game is neutral. 

To start, divide up into teams & decide who is going to be blue or red (I say that because some of them always wanted to be a certain political party) and then roll the dice to decide who will be going first. You also determine how long you are going to campaign for. The score sheet lists 30 weeks but we found that would take over 2 hours for a round so typically they played for 15 weeks.

Before you roll the dice for your turn, you decide if your team will campaign or fundraise. If your team decides to campaign, they will decide & announce which 3 states to campaign in then roll their 3 dice. Whatever 3 numbers come up determines how many chips you allocate to those 3 states. (each dice number goes to a separate state). The goal is to win control of a state. So if the state was neutral (no blue or red chips present) as soon as your political party has at least 1 of their chips in it, they currently have those electoral votes. The key is, both parties can keep fighting for a state which is what keeps this game exciting!

Let's say the democrats have 3 of their chips in Florida but the republicans really want that state and they choose to take 5 chips to put towards the state, 3 of their chips cancel out the democrats so the state of Florida now has 2 republican chips thus giving them control.

If the team chooses to fundraise for their turn, they announce that & choose which state to fundraise in as you can only do this in California, Florida, Texas & New York. To do this, you only roll 2 dice. You  have to put at least half that number in chips on the state you chose to fundraise in. The rest can be divided up amongst any of the rest of the states. Then you choose a card from the stack of political cards though you don't use this card during that turn but save it for a future time to take the opposing team by surprise (though a few of these cards state to play immediately). 2 examples of what these cards are "Your spouse supposedly makes some of the best mashed potatoes. The secret recipe is revealed at the Idaho Spud Day. Add 2 votes to Idaho." "A top DC lobbyist who your opponent befriended while in congress is indicted. Your opponent loses 2 votes from the state of your choice." There are also blank cards to write your own suggestions as well.

At the end of the campaign (however many weeks you chose to play) if there are any states that remain neutral or tied, a state is chosen and both teams roll a dice and whoever has the highest number claims that state. This continues on until all the states belong to one party or the other. The team that has the most electoral votes wins the presidency.


Another neat feature to this game is using the online interactive webmap where you could keep score there instead of using the score sheets. We felt this made it a lot easier to keep track of who had each state.

There was a bit of a learning curve to this game and it took a few times of playing to get it down. While it was an educational game helping the kids to understand the electoral college and the importance of strategization, it was just an overall fun game that they all have thoroughly enjoyed and perfect for all ages! This would also make a good game for a civics class at a co-op.

The Presidential Game can be purchased for $35.

Photobucket

Prairie Sushi (aka Tortilla Roll-Ups)

I teach a cooking class at our co-op. This semester I am basing it all on "fresh food", things I can get at the farm stands in the area. For our first day last week, I wanted something easy as I ease the class into cooking new things. I was inspired by the Pioneer Lady with this recipe and figured it would be a good one to start my class with.

When I told the students that we were making Prairie Sushi, I got the strangest looks. But when you see the picture, you can understand the name. Using a variety of fresh ingredients, wrapped up tightly in a tortilla shell does resemble traditional sushi.

The great thing about this recipe is you can use whatever your heart desires in it. You can make a lunch out of it or cut into pieces to serve as an appetizer.


We intentionally left the ends of the filling hanging out as we made them so when it was cut into pieces, it looked a bit dressy (and you weren't stuck eating plain pieces of tortilla). When spreading the cream cheese filling, make sure to spread it to the ends as this acts like a "glue" holding the wrap shut. You can use a variety of veggies or lunch meats. We made 2 varieties, one an all veggie using romaine lettuce (minus the spine), carrots, cucumbers and avocado. The other kind had carrots, cucumbers & chipped ham (use chipped lunchmeat, it just works better). You could even use some shredded cheese as well! And let me say, after julienning these things by hand, I SO want to buy this:
   
It would make some pretty cool zucchini noodles as well! It's on my list of things to get soon!

8 ounces cream cheese, Softened
1 Tablespoon chopped green onions or chives
1 Tablespoon minced fresh parsley
8 whole basil leaves, chopped 
 Salt And Pepper, to taste
1 teaspoon fresh lemon juice
8 whole taco sized flour tortillas
1/2 pound chipped turkey or ham
3 whole carrots, peeled And julienned
1 whole cucumber, seeds scraped out and julienned
3 leaves green leaf lettuce, spine removed
2 whole avocados, sliced
Make the herbed cream cheese by combining the softened cream cheese with the chives, parsley, basil, salt and pepper, and lemon juice. Stir to combine.
Spread cream cheese in a thin layer over the tortillas. Lay ingredients down the middle of the tortilla: for the turkey or ham rollup, use turkey/ham, carrots, and cucumber. For a "salad" rollup, use lettuce, carrots, cucumber, and avocado. Let the veggies extend past the edges on either side.
Roll up the tortillas as tightly as they'll go, then wrap each rollup in plastic wrap and refrigerate for one hour.
To slice, cut each rollup exactly in half, then line up the two halves and cut them in half again. Stand the end pieces up so that the veggies stick out the top.

Cade's Cove- Tennessee

I shared a few weeks ago about some of the field trips we went on while camping in Tennessee with our friends (Titanic Museum & Ripley's Aquarium of the Smokies). Another fun trip we took with our friends was a visit through Cade's Cove.

Cade's Cove is an isolated valley in the Great Smoky Mountain (and now a national park).  The first settlers were Europeans in the early 1800's and many of their original buildings are now preserved just as they were back then. Cade's Cove has an 11 mile, one way road that you can slowly drive on to not only tour different cabins, churches & mills but also see some awesome landscape and wildlife.

We headed out the morning of August 6 thinking we'll spend maybe 3 hours or so there. Ha, over 9 hours later, this is just a glimpse of our day there!


(click on photos to enlarge)


As we walked back a trail, we were amazed to see a young buck & doe together who didn't even startle by our presence. As we continued along, they meandered out on the trail about 8 feet in front of  us, so cool!!! (these are just a few of the many pics I took of them)

One of the many hikes we went on.


Such amazing history in these churches.  We sat through a 20 minute presentation by a park ranger that was chock full of amazing info!!!


He explained how this church was built using green pines which are impressionable by hand literally until they dry out. This picture is a photo of the ceiling where you can easily see imprints of hands of both grown men & boys he said since the wood was still soft & wet when they built it. (& this goes back to the 1800's wow!)

Oh how my mama's heart hurt as I walked through many graveyards on this trip. What really caught my eye were the many stillborn graves I saw as well as grave of little ones who lived just a few months. I was SO thankful to see that despite the times, these precious lives were acknowledged & remembered!! For example, check out the graves above. I hadn't noticed right away until I studied them. Here was a set of twin sisters Lura Louella & Lora Estella born together in 1911 but sadly Lora was stillborn. Get this, her sister Lura lived into her 90's and when she died, she was brought back and buried next to her infant sister in 2004!!!!! Both their headstones have a lamb on top.

I actually have many other pics I took of infant and toddler headstones. My heart ached when I saw a family that had buried 3 sons within 3 years. So unfair. How I would've loved to learn more of their story.


Yikes, murdered by the rebels!!!!

As we hiked back from seeing the above cabin, some of the kids were in front of us. All of a sudden, we heard them screaming as they came running towards us. A snake had gone across the trail in front of them and they almost stepped on it. We reminded them not yell or run like that when seeing wildlife. Not more than a few minutes after that, Susan and her friend were up ahead of the group on a small hill. We were almost at the end of the trail and back to our vehicles. All of a sudden they stopped dead in their tracks and turned around, eyes wide as they pointed & whispered "bear"!!! We were like WHAT?!?! (ok so we didn't yell it but felt a sense of panic for sure). We gathered everyone close while someone from the group went up the hill to take a look. It was a black bear cub which means where there is a baby, there is a mama. Double yikes!! Of course there was brush on either side of the trail so we knew mama could come out of anywhere. The cub scampered off before anyone could get a picture and we cautiously made our way out to the road. 2 people from our group hadn't gone on this hike so when we came out & told them how we just saw a cub, they said they noticed people were stopping on the road near us and were taking pictures of what we assume was the mama to the bear cub, eek!! Crazy how close we were! It sure made for a memorable experience. I am just thankful we were all kept safe!


And then there was the hike to Abram's Falls. It'll be fun we thought. HA!!! So we start off, ok, not bad. Then we get further down the trail, lots of rocks and then it gets narrow. Not a big deal, unless said trail is only 3 feet wide, rocky AND on the side of a mountain with a steep drop and no safety rails. Ugh, talk about feeling super anxious as we continued on. And this trail went on and on and on. We finally get there and we looked at the falls and said we went through all that for THIS?!?! The falls were only about 35 feet high and there really was not much else to see in the area. The kids waded around in the water for a bit (did I add it was HOT to the list?!) We didn't stay too long as we were all hot & tired and knew the hike we were facing to get back to our cars.

I had hiked with Ava in the moby wrap on me, thankfully she slept on the way there, woke up to nurse once we were there and fell back asleep on the hike back. On the way back, Olivia was tired and didn't want anyone to hold her besides me. Rather than listen to her whine for the 2 1/2 miles back, I carried her in addition to having Ava strapped to me! Yeah I got my exercise that day!! The kids had said they wished we had music to as we hiked out of there, so I pulled up on my phone, my playlist I use for running and blasted music. Ya know, we made the hike out 12 minutes faster than it took us to get in. And that was with me carrying two kids and all of us being tired so that music really helped!

All in all, it was a memorable day spent with great friends!!!