Cruise Day 2- Monday November 1st, 2015

*All photos can be clicked on to enlarge.

Today we woke up to find it overcast and lightly raining. It was SO nice being able to just glance out our balcony and see daylight. We all woke up a lot earlier than we needed to, probably due to our bodies still adjusting to the time change. We headed down to the main dining room for breakfast. Their suggested egg item of the day was juevos rancheros so I opted for that. It was an interesting combo and quite tasty. But then again, I love black beans & avocado, just never thought to toss it over a fried egg.


Cruise Day 1- Sunday November 1st, 2015

Cruise Day 1-Sunday November 1st

I awoke at 2:30am, not too bad considering the time had changed and my body thought it was 3:30am. I knew I couldn’t sleep anymore as I was going through my mental check list to make sure I had gotten everything done I needed to as well as making sure everything was packed. Usually the night before we leave for a major vacation, I am scrambling to finish packing but I was actually done early evening and had time to just relax. I think we've traveled so much that this is old hat for us now!

*Note-all photos can be clicked on to enlarge.

Not bad for 8 of us for 13 days! The duffle bag is all our shoes. I limit us to 3 pairs each as they add up. We probably could've shaved down a bag if we didn't have to have medical equipment for Kevin & Susan to pack.

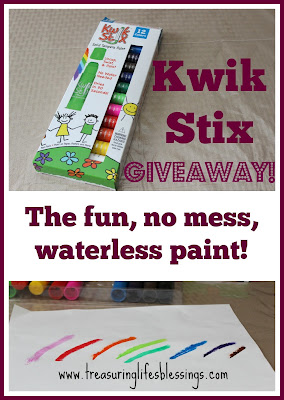
Kwik Stix Giveaway!

My toddler and preschooler LOVE doing crafts, especially painting but it's not always convenient to paint. Ya know, the mess of water spilling, paint getting on clothes, etc. I was recently introduced to Kwik Stix from The Pencil Grip, Inc.

Kwik Stix


When It Comes to Travel Deals. . .


I am your person to contact!

I have enjoyed traveling for many years as well as helping my friends find deals and plan their vacations. I figured I might as well turn my hobby into something more so I recently became an Independent Travel Consultant!! (<--- that's my bio that you can read more about).


Pre-Cruise Report

So before I start sharing our daily cruise journal from our past trip, I thought I'd sort of give a background as to how this trip came about.

We certainly weren’t planning to go on a cruise this year. But I always keep my eyes out for deals, I can’t help it. Back in August, I happen to see a great price for another repositioning cruise like we were on last year. While I sat on the fence about it, Kevin booked flights home forcing me to book the cruise! LOL (but seriously, repo cruises are SUCH a bargain and often cheaper than regular cruises so we would’ve been crazy to have given this up).


Kohl's Black Friday Sales-FREE appliances!

Kohl's Black Friday sales are already live. One of my favorite sales they offer is on some inexpensive appliances. We have a camper so these deals made it handy to stock it with a griddle & crockpot last year. I also bought a second griddle for everyday use as we need 2 for our large family when making pancakes.

Kohl's Black Friday deals

Cauliflower Pizza Crust

Say WHAT?!?! Oh yes I just went there, a totally gluten free pizza that rocks!! Since cauliflower is in season right now and super cheap at the local farm stands, I've been finding myself experimenting with it lately. Cauliflower is becoming more versatile like zucchini.

Cauliflower Pizza Crust

They Keep on Growing Up!

Recently I shared how my firstborn just turned 16 yrs old! Since we left shortly after their birthdays for vacation, we weren't able to get their permits.

Well today, we took the plunge!

After spending over an hour simply waiting, they were each called back to take their test. I would've taken photos but I knew they'd have a cow! Ha!


Fall 2015

Ok, I KNOW I am behind in sharing this upcoming photo. BUT ya'll gotta cut me some slack. We just returned from a 2 week vacation that had us unplugged and out of the country (more on that in up-coming posts, woohoo!) So this left the end of October very busy for us. Between celebrating our twins 16th birthday and getting ready for a major vacation, life has been a bit crazy.

All that to say, while we don't celebrate Halloween, we DO enjoy carving pumpkins for fun and roasting the seeds.

Here is a photo of the pumpkin I personally carved this year. Let me preface this by saying YES I carved it myself and YES I did it free-handed with out any template or stencil. I really do have a love and talent for art but rarely have time to put it to use. Here is a brief glimpse of my talent and *ahem*, upcoming future. . . ;)


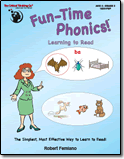
Fun-Time Phonics!

Back when I started homeschooling, I didn't have as many choices for curriculum in aiding me to teach my children to read as I do today. Not knowing where to start left me floundering for a bit. My favorite types of curriculum to use in the younger years are those where the directions are simply laid out for me to instruct my children and all the prep work is done. So I was excited to recently review Fun-Time Phonics! from The Critical Thinking Co.


The Critical Thinking Company produces award winning curriculum for preschoolers all the way to 12th grade in a variety of subjects. Their goal is not to teach just repetition or memorization but rather teach the student to analyze what they are learning and to help hone their critical thinking skills, making children better problem-solvers.

Fun-Time Phonics! is a systematic phonics program geared towards preschoolers through 2nd grade. Using listening, speaking, reading and thinking activities, students are introduced to the concept that spoken words are made up of individual sounds. The idea behind this program is not to teach reading "rules" but to help the child understand how individual letter sounds form words so they can then learn how to see that reading is a pattern based activity.

This book is a 314 page paperback book that contains 100 colorful activities designed to teach phonetic and alphabetic skills that lay a strong foundation to reading. They use a "spiraled" approach to teaching meaning that each lesson builds off the previous one so it's important that the child understands and masters the lesson they are on before moving on to the next activity.

Not only does the student learn to start decoding sounds and words but because pictures of the words are also included in the activities, they start to build up their vocabulary. So they learn to hear, see and say the word which helps solidify the lesson.


The curriculum is self paced and each activity has directions for the parent on how to guide the lesson. The beginning of the book goes over learning beginning and ending sounds by having the parent show the child words and asking them to point to the photos that start with that letter sound. They emphasize that whenever you see a letter between 2 slashes like this /t/, you are to say the sound and not the letter.

The activities then move on to having the child listen to words and pick out those that rhyme with other words. This is to help them learn and recognize that vowel sounds are separate from beginning and ending sounds. Sometimes in doing these lessons, you have to over-emphasize the sounds for the child to hear them better. After the rhyming activities, they move on to echoing vowel sounds activities.

Once these foundation building activities are completed, the lessons move on into working with the individual vowel sounds with many different activities. From there, the activities then move on to having the child actually point to and pick out the letter (from a choice of 3) as you say the word. Finally, the activities move on to combining a consonant sound with a vowel sound, taking each consonant in alphabetical order and pairing it up with all the vowel sounds before moving onto the next consonant.


By the end of the book, the activities have the student filling in a missing letter to the word. By this point, the student should then be able to read the list of almost 200 3-letter words that are in the back of, simply because they learned how to decode sounds and letters.

I used this curriculum with my 4yr old daughter who has been writing her name since age 3 and has been working on her letters and some sounds already. Depending on the length of the activity, we usually just did 1 a day, sometimes a second one if it was short. But we then went over it a few times as she enjoyed picking out the pictures and saying the sounds with me. The book suggested to use paper to block out all the other words on the page except the one you wanted them to focus on which was a big help to keep her from getting distracted. Sometimes she chose to read the letters of the words after we practiced the sound. Once I felt that she had that lesson down, we would then move on.

Once we get further on in the book, I'm sure she will practice writing the words out as well. As of now, she writes about half her alphabet.

I can see how this skills building curriculum can really help break down learning to read into easy steps. I appreciated that this program was simple but yet colorful and still kept my daughters attention. It is one we plan to continue with and I look forward to seeing her reading all those words at the end of the book!

Connect with The Critical Thinking Co:
Facebook
Twitter
Pinterest
Google+

The Critical Thinking Company Review
Crew Disclaimer

Wordless Wednesday-A Sunset Photo


I love & miss you my precious son!

Phonetic Zoo Level B

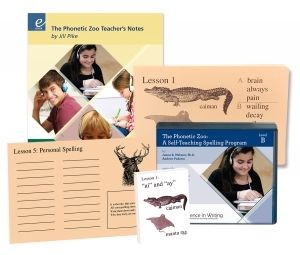
Spelling is one of those subjects that can often get overlooked in homeschooling. Sure, our children pick up and learn words through writing projects but there are times they need to learn certain "rules" to spelling. One program that not only teaches spelling by phonetics and sequential repetition but also teaches spelling rules is Phonetic Zoo, by Institute for Excellence in Writing (IEW). The specific level we reviewed was Phonetic Zoo Spelling Level B (Starter Set).


Phonetic Zoo uses a multi-sensory approach to teaching spelling. The student listens to words being read while writing the words down at the same time and also has lesson cards that list the words they can study.

This spelling course comes with several different products:
  • Phonetic Zoo Lesson Cards- These cards have pictures of animals on the front whose name corresponds to the sound that that lesson is teaching as well as 3 words from each level for that lesson. On the back, the card has the jingle or rule that pertains to that lesson as well as the full spelling list of 15 words for each lesson. The cards are printed on heavy stock card and has a hole punch in the corner if you want to keep them connected together.

  • Spelling Zoo Cards- These cards are a small set of cards (think playing card size) that have the same animals on the front as the Lesson Cards with the "sound" that that lesson is teaching listed at the top. The back of the card lists the jingle or rule that helps teach the sound & spelling for the words being taught in that lesson.

  • 5 audio CD's- These CD's contain the spelling list that are read by the instructor. The teacher also spells out the words for the student to correct their words. You also have the ability to download the MP3 of the lessons if you didn't want to use the CD's (such as putting it on an iPod).

  • Downloaded teacher's note- This comes in a PDF file and explains just how to use the program as well as lesson plans for each lesson.
  • "Spelling and the Brain" video seminar- This seminar explains the how & why their program works as well as the importance to using headphones when listening to the spelling words.

This program contains 47 lessons as well as a final test. The way the teachers manual has this laid out is that the student and teacher sit down before each lesson to go over that lessons rules or jingle and to look at the words for the lesson. Using a sheet of notebook paper, your child writes the numbers 1-15 on every other line. Then they put on headphones (highly recommend by IEW to use) and listens to the spelling words that are read by itself as well as in a sentence. Once all the words are read, the instructor on the CD goes back and spells out each word for the student to see if they got the words correct and to rewrite the words that were misspelled. Another key point that is stated in the teachers manual, the student is to use pen to write their words. Any corrections done are to be done next to the misspelled word.

All in all, this doesn't take long at all for a student to complete. The next day, they repeat the same lesson. Once the student scores 100% twice in a row, they can then move on to the next lesson. This program is self paced so there is no rush to push through each lesson.

There is also a personal spelling list for every 5th lesson. This is where the student can write down words they misspelled in the previous 5 lessons to practice.

Because my 10th grader wanted to use this program to brush up on her spelling, she used this completely independent of me. She uses a spiral bound notebook to write her lessons in. Usually the first time she did a lesson, she listened to the CD. When she repeated the lessons, she had me read the words out loud to her then she looked at the spelling list to correct it herself. It really only took her less than 10 minutes a day to complete. We both liked that this was self-paced and that she could make slight changes to it (such as having me read the words) to suit her style.

There are 3 levels to Phonetic Zoo and they offer a Placement Test online to know which level your child would need. Another note about this program is that you can use it with multiple children!

Connect with Excellence in Writing on:
Facebook
Twitter
YouTube


IEW Review

Crew Disclaimer

Koru Naturals

Earlier this year, I shared with you all about some products I tried out from Koru Naturals that I absolutely loved. Recently, I was given a chance to try out and review some more of their naturals products. I received Skin Clear CreamManuka Honey Propolis Soap, and Argan Oil and Sandalwood Hair Tonic.

Koru Naturals is a New Zealand based company that provides a variety of hair care, skin care and general health items that are all derived from naturals products. Manuka honey for example were in 2 of the products I tried out.


The Skin Clear Creme is geared towards those who are acne prone though it works as a great moisturizer even if you aren't. Some of the natural products in this creme are manuka honey, burdock root, thyme, kawakawa and harakeke (traditional Maori remedies for skin conditions). It is recommended that this product be used by kids 12 and older and that pregnant women abstain from using it due to one of the essential oils it contains.

The creme comes in a small container and when you open it, you'll find a lid on it with a small paddle which is used to scoop the creme out so you aren't having to put your fingers directly into the creme (and not introducing bacteria into it). It's suggested use is twice a day and a little of this creme goes a long way. My teen daughters were the ones who begged to use this creme for the review. They said they liked the feel of the creme and that it was fast absorbing and not greasy. Overall, they think it helped clear up some of the acne they were dealing with and plan to continue using it.


The Honey & Propolis soap has been one of my favorite products to try out. Even while still in the package, you can smell the sweet honey smell from the soap. Both honey & propolis are known to be skin moisturizers. Honey also has anti-bacterial affects and what better way to protect your skin than using a natural soap!

When taking the soap out of the package, you can see the 2 toned colors and that it is a large bar. 


Not only do I enjoy the pleasant honey smell of this soap but I loved how it made my skin feel. My skin felt soft and silky after using it. I also used it as a face soap. It lathers up quite easily and this bar hasn't even looked like it has been used much even though I've used it almost everyday for the length of this review. So I have no doubt this bar will last a long time!


The Argan Oil and Sandalwood Hair Tonic is made up of a blend of essential oils to moisturizer and tame frizzy hair. It comes in a pump bottle making it easy to apply. The recommended amount to use is 2-3 drops for your hair (which means this bottle will last for a long time). I really enjoy the scent of the tonic as I love the smell of sandalwood essential oil. 

My daughters and I all used this during the review and found it really works well to get rid of the frizzy hair. We used it on both wet & dry hair with the same results. Typically if we let our hair air dry, it would end up frizzy but if we applied a little bit of this tonic to damp hair, it dried without the frizz. Or if our hair was already dry, a few drops of this hair tonic made the frizzy's disappear! We simply put a few drops of the tonic into our palm, rubbed our hands together then ran our hands through our hair.

If you like using natural products for your skin & hair, check out all the different things Koru Naturals has to offer!

Connect with them on:


Koru Naturals Review

Crew Disclaimer

Sweet 16!

I can hardly believe it but I am officially the parent of TWO 16 year olds! Yes, today is my twins 16th birthday. I just don't know where the time has gone.

For those that don't know, I didn't even know I was having twins until I was 36 weeks pregnant! Shocking I know! I am a small gal and was only measuring big enough for one baby most of my pregnancy. It wasn't until 36wks when my midwife was palpating my belly to feel the position of the baby when she became confused. She kept feeling a head & butt in 2 different places. She said either something is wrong or you have more than one baby in there. So off I went for an ultrasound that showed us we were having twins!

Of course because I was already 36wks, they told me I could have them at any time. HA! In those last few weeks, I popped out immensely (to the point I couldn't fit into maternity clothes) and became SO uncomfortable! Nope, those 2 stinkers were not coming out on their own so right at 40wks I was finally induced! (presenting baby was head down which meant I could have them naturally). Unfortunately, I don't have many photos of me when pregnant with them (and the few I have, I need to dig for). This was before the era of the internet & Pinterest with all the "cool" maternity photo ideas.

About 2 hours into labor, they did an ultrasound to check on the babies and didn't my presenting twin somehow turn herself breech which resulted in me having a c-section. (*ahem* thanks Sarah! lol)

We didn't know what we were having so we were pleasantly surprised to hear "it's a girl" twice! For only gaining 25lbs and not knowing I was having twins, they were a great weight. Sarah was 5lb 6oz and Susan was 6lb 2oz, both 19". We called them our little monkeys because of the full heads of dark hair they had.

They shared a bassinet (look at that HAIR!)

About a week old and me enjoying walking them slowly around the block.


Their 1st birthday!

Their 3rd birthday!

Their 4th birthday!

Fall 2005, they were 6yrs old

Our first cruise in 2008, they were 9yrs old

The girls 11th birthday

Their 13th birthday surrounded by their close friends!

Officially employed at 14 1/2!

Headed off to work June 2015

While these photos are just a brief glimpse of the last 16 years, it's been an amazing journey thus far. God has blessed me with some AMAZING children! Sarah & Susan are my oldest and often what I tell them, my "experiment". I am far from perfect and mess up quite often as a parent and have to go to them and ask forgiveness. Not many people jump into parenting with 2 children right from the start so that has added it's own set of challenges, learning to balance 2 children an identical age but 2 different personalities.

What I can tell you is that these young women are some of the most sweetest, caring gals you could be blessed to have in your life. They go out of their way to be there for their friends, they are both huge helpers with their siblings and they seek to follow Jesus with their whole hearts.

I can hardly believe we have already reached this milestone as it feels like yesterday they were just born (and it seems like *I* was just 16 myself!)

Happy 16th Birthday Sarah & Susan! We can't wait to see where God continues to guide you both in life!


How to Clean Your Shower Head Effortlessly!


I'm so excited to share my latest money saving (and time saving) tip that I recently tried out! I noticed for awhile during my showers that some of the holes were clogged and I had gaps where there was no water coming out. Honestly, cleaning this was so low on my list of to-do's, I just dealt with the sporadic water stream. But the other day I got the itch to try something new, or maybe it was the fact that I walked into my bedroom to get something, noticed wash in the bathroom that connects to our room needed to go in the hamper, as I went to grab that, the shower curtain was crooked so I went to straighten it but then the bright idea of cleaning the shower head struck me. Ya ever do that? Walk into one room to do something and end up on a rabbit trail far from where you started & never accomplished what you originally intended to do? Yeah me either.

Anyway, I've shared before about the awesome powers of vinegar and how I use it to clean anything. Well friends, dig out that bottle of vinegar, a plastic baggie and a twisty tie as that is all you need to get rid of mineral build up from your shower head. Yes, this really IS that simple!


Pour some vinegar into a sandwich baggie and slide it over your shower head, securing it with a twisty tie making sure that vinegar covers the entire front surface of the shower head.

That's it! Now go put your feet up, make a cup of iced coffee and read a good book.

Ok, that's what I wish I did after I took this picture. Instead, I returned to my mountain of zucchini's and worked on whipping up some food. Meanwhile, I forgot what I went into my bedroom to get, the wash never got to the hamper and the shower curtain was still crooked BUT I was on my way to a clean shower head! haha

Anyway, let that baby soak for several hours or overnight. I was itching for results so I just let this soak for a few hours then took off the baggy and this is what I got:


Perfectly streaming water out of each & every hole and no more mineral build up!!! No nasty chemicals, no scrubbing or taking apart the shower head, just a nice soak and only costing you a few cents for the vinegar & baggie.

Oh, and after I took this last picture, I finally did straighten the shower curtain & put the wash in the hamper. I'm still trying to remember what I went to my bedroom for.

What's one of your favorite cleaning tips that saves both time AND money??

Don't forget to check out my other Money Saving ideas.!


Middlebury Interactive Languages

When it comes to teaching my children a foreign language, I appreciate getting added help. Especially when it's interactive, online language help! We recently had the chance to review High School Spanish from Middlebury Interactive Languages.


Middlebury Interactive Languages has a special section for homeschoolers. They offer French, Spanish, Chinese and German. Many of these languages are offered from Kindergarten all the way to 12th grade.


The self paced course teaches the languages by using total immersion through text, audio, video and images. This is put into practice by listening to the language, practice speaking the language, as well as reading & writing the language. The immersion approach not only teaches the student language skills but also teaches them cultural awareness which we found quite interesting learning those added facts!

The program also offers an addition of having a teacher work with the student (for an added fee).Though we didn't try this portion of the program out, it is a nice to know it's there. I took several years of Spanish in high school and lived in Peru for awhile so I felt pretty confident in helping my daughter out when she needed it.

Each course is set up to be 1 semester long. This equals out to 18 weeks doing 5 lessons a week. The program is set up for the student to work independently though there is a gradebook for the parent to check in on completed lessons and grades.

 To start using the program is quite easy. It's just a matter of signing in and going to the main menu. From there you could choose to view the course in a calendar layout or by the table of contents. My daughter (and I) preferred the table of contents layout as when she did her lessons didn't always correspond to the same day of the month that the lesson was listed under.

With the table of content view, you could see exactly where she left off at as it automatically put a check-mark beside each part of the lesson she completed. There are 18 units with 5 lessons in each unit, a midterm test at week 9 and a final test at the end. There were also some quizzes throughout different lessons. The first lesson in each unit goes over the objectives and what the student will learn in the next 5 lessons.


(click on photos to enlarge)

Frequently used conversational language was taught right from the start. They used a variety of methods to help instill the words into the student through having them match up phrases (Spanish to English translation) and even pictures to words.


At times, the student also practices spelling the Spanish word (as in the above print screen). There is an audio button they can click on to hear the phrase being read. The student can also practice speaking the language themselves in the sections called "speaking labs". This is where you hear the teacher say a word or phrase using a microphone, you can record yourself saying the same thing then play them back to see how closely you matched the teacher's word.


Another way the student practices the language is by listening to the teacher read a paragraph in Spanish. While listening, they have to check off the words or phrases they heard being read to them. This connects the auditory to the visual aspect of learning the language.

We found this program easy to use yet very engaging. The photos they used are ones that show kids of the same age as the student who is using the program so it feels more relatable. The voices (both male & female) that spoke Spanish were clear and easy to understand. The lessons weren't boring as each section of a lesson was short and to the point. It took my 10th grade daughter approximately 20 minutes to complete each lesson. 

Connect with Middlebury Interactive Languages:

 Middlebury Interactive Languages Review

Crew Disclaimer

Capture Your Grief 2015

Once again, CarlyMarie is hosting Capture Your Grief in honor of October's Pregnancy and Infant Loss Awareness Month. This month is so significant to many of us moms who have lost a child. We both participate in and cherish those of you who also join us and acknowledge this month and our children we are missing.

Click on Photo to Enlarge

This is the daily prompt of ideas for taking a photo. Feel free to share this on your own Facebook page, Instagram or you are welcome to even post it on my Facebook Page. I will be trying to participate as I can.

More info on Capture Your Grief

Join the Facebook Event


Game Review from USAopoly-Tapple and Wonky

Ever since my kids were young, I knew I wanted to have a game closet, filled with all sorts of games! Every Christmas we add to our growing selection of games which include both fun & energetic games as well as educational & strategy thinking games. We recently had the opportunity to review 2 games from the company USAopoly. The games are Wonky: The Crazy Cube Card Game and Tapple: Fast Word Fun for Everyone.


USAopoly is licensed under Hasbro and has been producing board games and puzzles for over 20 years. Their goal is to bring friends and family together through their games to create memories.

As soon as our games arrived, my kids wanted to dive right into them. We opened Tapple first. This game is an exciting, quick moving word game to play with 2 or more players, ages 8 and above. After a quick glance at the directions, we realized this was a super easy game to play. We needed to put 2 AA batteries in the back for the timer and mix up the stack of cards that came with it. The cards have 2 sides to them with each side having 2 categories. The red side of the cards has more challenging topics while the blue side has easier topics.


Everyone sits in a circle or around a table. The player that goes first chooses a card then decides which topic they want. Some of the topics include words such as: "In this room" (where you'd name things you see in the room), "Candy" (name different kinds of candy or maybe even candy companies). "Leaders & Politicians" and "Computer Terms" are some of the more difficult topics.

To start, the first player hits the big red button in the middle of the board which starts the 10 second timer. The goal is for each player is to push down an available letter button, naming a word that starts with that letter that is relevant to the category on the card. Once the word is said the player then hits the red button that restarts the timer for the next player. Each player keeps going around doing the same thing. If a player doesn't name a word before the timer goes off, they are out that round. You keep playing until there is only 1 person left who then wins that round and collects the card. Once a player has collected 3 cards, the game is over and they are the winner.


We loved how fast paced this game was and how creative yet quick thinking you had to come up with a word. The less letters that remained, the harder it became to think of a word. I am impressed with the card storing feature on this game. On the underside of the plastic game board is a compartment that the cards fit in perfectly to store. No worries about cards getting bent or lost!

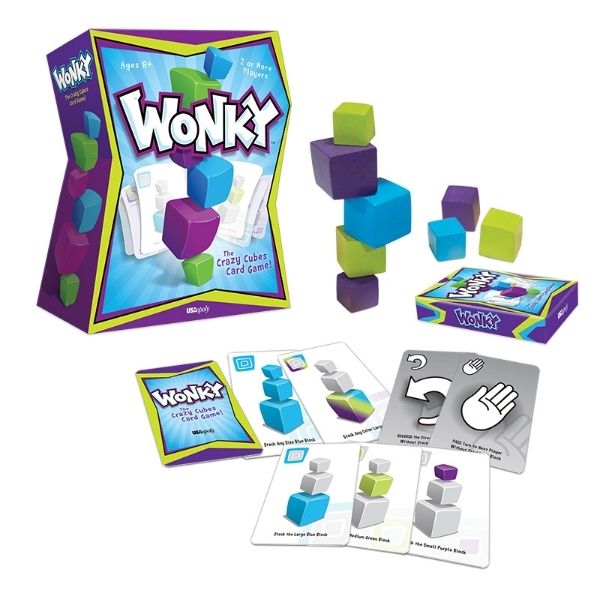
Wonky is a completely opposite game in that it is a slower paced, strategy game that uses fine motor skills. There are 9 blocks in 3 different sizes and colors that come in a nice storing pouch. There is also a deck of cards that accompany the blocks. This game is played with 2 or more players, ages 8 and up.


 To start, the blocks are laid in the middle of the table and each player receives 7 cards with the remaining stack of cards turned upside down in the center of the table. Each card has directions of what color and size cube to add to form a stack of cubes. What makes this game "Wonky" is that each cube has curvy sides to it so it takes some strategizing and careful placement to put one cube on top of another without making the tower fall. There are also some "fun" cards placed in the mix such as skipping a turn or reversing the order of players. If the tower falls over while you place a cube, you have to pick up 3 extra cards. To win, you need to be the first person to get rid of all the cards in your hand. 


Both of these games were not only a huge hit in our family but also with the kids friends as well. During this review, we took the games camping with us as well as to our co-op where the kids got to play with their friends. Everyone gave both games rave reviews and will be ones we will continue to play!

 USAopoly Review
Crew Disclaimer