Showing posts with label hsmommas. Show all posts

Paleo & Gluten Free Buffalo Chicken Nuggets


If you are like myself, I am always on the lookout for tried & true recipes that the whole family enjoys. I love cooking from scratch and do so whenever I can. Today's recipe falls in line with not only "from scratch" cooking, but is also Paleo & Trim Healthy Mama friendly AND gluten free!! The bonus?? It was a hit with my kids!! What is it??

Homemade Caramel Popcorn


Today's recipe is one I make only for when we go camping. Because let's face it, this isn't exactly one of my healthier recipes. It also makes SO much so it's perfect to take camping to share with all the other families we usually go with. It's become a tradition now that we can't go camping without this tasty treat!

homemade caramel popcorn


Lightning Literature and Composition

We are big readers in this house and are always at the library checking out books. Some of the reading is for fun and other times it's required reading for school. I wasn't sure what I wanted to do for a lit course for my girls this coming school year so I was excited  to be given the opportunity to review Lightning Literature and Composition-Grade 8 from Hewitt Homeschooling.


What is it?

Lightning Lit & Comp is a full year course for 8th and 9th graders that is designed to help develop a love and understanding of literature while exposing the student to different kinds of literature that they might not have read on their own. It's also a way to help them become better writers by reading different genres of stories and books as well as practicing different writing techniques. Lightning Lit takes what a student reads and helps them dig deeper into the book through a variety of methods and exercises.

We received 3 books for this level:
This course covers several books:
  • Stories & Poems for Extremely Intelligent Children (a book of short stories & poems)
  • Treasure Island
  • A Day of Pleasure
  • A Christmas Carol
  • The Hobbit
  • My Family and Other Animals
  • To Kill a Mockingbird
The student guide breaks each book or short story down into different sections that include an introduction to what is being read, a vocabulary list (which you could turn into your own vocab/spelling list), comprehension questions, a literary lesson, a mini-lesson and a variety of writing lessons. There isn't any writing in this book though the student completes different exercises in a notebook or on paper.

The student workbook is a consumable book that has the student working on grammar, analyzing parts of the book, doing crossword puzzles, short writing exercises and discovering the author's purpose just to name a few things. These activities vary by book which in my opinion keeps things new and engaging for the student.

The teachers guide contains a weekly planning schedule for 36 weeks as well as all the answers to everything the student completes in the workbook. It also has the discussion questions that aren't listed in the students book.

How did we use it?

The first story that was covered was A Crazy Tale from the book Stories and Poems for Extremely Intelligent Children.  Because this book is used interspersed between the full books throughout this course, I decided to buy it as we would be using it often. (hint, it's easy and inexpensive to find used online). All the other books in this curriculum are easily found at our local library though when purchasing this course, you do have the option of buying this course with all the literature books included.

I used this course with one of my 14 year old daughters about 3 times a week (only because it was summertime, during the school year it will be every day). She enjoyed diving into not only her reading assignments but looked forward to what the student guide & workbook taught her. She felt that the "clues in the story" section helped teach her to really pay attention to what she was reading and looking beyond just the words on the page and really see what the author was trying to convey. At the end of the 1st chapter in the student guide, it taught her how to take notes which was something she hadn't done much of in a while. Also included at the end of each chapter is several writing exercises you or your child can choose to complete. If you didn't have a writing curriculum you were using, you could easily use these exercises to fulfill a writing course!

I enjoyed the discussion questions that were in the teacher guide as being able to converse about the book showed me how much she was understanding about what she had read. I have also taken the vocabulary words and plugged them into the curriculum she uses for spelling & vocab. I love being able to take what we are using in one subject and use it for another subject.

My thoughts?

Bottom line, this curriculum has been a huge hit in our house! In fact, a few weeks after we started using it, I decided to go ahead and purchase Lightning Lit for two of my other children for this coming school year. I love the ease of use and how well everything is clearly laid out in not only the student books but the teachers guide. It makes this curriculum one you can just pick up and teach. Being a busy mom, not having to plan out the lessons is something I appreciate! Also, at this level, my daughter was able to do most of everything on her own. I also love the great literature these courses cover and am looking forward to this coming school year and seeing what all my children will learn!

Check out Hewitt Homeschool to see all the grades & curriculums they offer!

Connect with Hewitt Homeschooling on:
Facebook
Twitter
Pinterest
Google+
Their Blog

Click to read Crew Reviews
Crew Disclaimer

Golden Prairie Press- Heros and Heroines of the Past


We've been studying American history this year so when we had the opportunity to review Digital Heros & Heroines of the Past: American History Curriculum from Golden Prairie Press, we jumped at the chance. I thought it would be a nice change to dive deeper into the people who have helped shape America.

What's included:
  • Heroes and Heroines of the Past: American History Part 1
  • Heroes and Heroines of the Past: American History Part 2
  • Additional Materials Download
  • Historical Skits ebook
  • Sing Some History CD
  • Listen to Some U.S. History MP3 CD
American History Curriculum

What it is:

Heroes and Heroines of the Past is an American history curriculum that makes history come alive through many creative activities & resources. This curriculum is intended for grades 1st-6th grade though older students can use it as well. We received PDF's and downloads of this curriculum though the ebooks can be purchased already printed out (the photos will be in black and white whereas the PDF has many beautiful colored photos).

American History Part 1 has 380 pages and American History Part 2 has about 400 pages. Between both books, there are a total of 30 units with 5 lessons in each unit. While the books list the history chronologically, you could pick and choose what unit to work on if you wanted to study a certain time period. The first part of each lesson is geared for the 1st-2nd grader with larger font and a simple, shorter version of the lesson that comes after that which is for the 3rd-6th grader. The second "edition" of the lesson is longer and uses larger vocabulary. Each unit also has a Bible verse you could use for memorization if you wish.

At the end of each lesson, there are other suggested activities to accompany what was just read. They vary by lesson but some of the extras are things such as:
  • games to play
  • recipes to make
  • questions to answer
  • crafts
  • experiments
  • writing topics
  • maps
  • timelines
  • examining historical art
  • suggested additional literature books
  • act out historical skits
  • sing some history (songs)
  • listen to some history 

How we used this:

We did a lesson each day for about 4-5 days a week. Even though it's for 1st thru 6th grade, my 7th & 8th graders also participated. We each took turns reading aloud the text from the computer and then passing it around to view the varying pictures that was in the lesson. They took turns answering the questions orally that were at the end of the lesson. For the older ones, sometimes they would do the writing topic that was suggested. I had also printed out the blank timeline that was in the "Additional Materials Download" for each of them to fill in when indicated.

They enjoyed listening to the "Listen to Some History" audio files such as The Declaration of Independence and the Midnight Ride of Paul Revere. We also listened to some of the songs from the "Sing Some Songs" section and followed along with the music that was in the lesson. Occasionally one of my children would even use the music to play it on the piano.

We used our own map to locate the different places when it suggested to in the lesson because scanning back in the PDF to go to the map that was in a different lesson took too much time. (This is where a printed version would be handy as all you would have to do is page back). I wonder if including the PDF page number would've made it easier since you can just type the page number in at the top?

We loved looking at the historical art that was included and finding what they were asking us to locate. We didn't do many of the crafts as my children thought they were geared toward younger kids using this curriculum. I did scan through the lessons we haven't yet covered and saw a neat experiment making invisible ink we plan to try!


My children had fun acting out the skits that went along with some of the lessons. I would print a copy for each child then highlight the characters line they were going to read. Sometimes we just read the skit, other times they got into really acting by following the prompts listed and changing their voices! We thought that including the skits was a great idea to help make history relatable! There were also some games scattered throughout the lessons and 2 of them that my kids thought were fun was the "Thimble" game & "Stir the Pot".

Overall, we really enjoyed this curriculum and the many ways it brought history to life. I personally would've liked to have had this printed out, and I still may do that and take it somewhere to bind but you can purchase it already printed out for the same price as the PDF version. I loved all the extras that came with this curriculum but would possibly have liked to have seen the lesson number listed with the file to make finding them a bit easier.

Heroes and Heroines of the Past: American History Curriculum is available for $98.99.

Connect with Golden Prairie Press on Facebook

Click to read Crew Reviews
Crew Disclaimer

Logic of English: Essentials


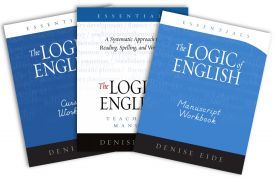
I have explored different reading and english programs over the years we've homeschooled though I admit I hadn't heard of Logic of English before. We recently had the chance to review one of their programs, Essentials: Logic of English Complete Set for Manuscript. We also reviewed Phonics with Phonograms App on our iPad.

Logic of English


What it is:
The Logic of English Essentials program as stated on their website is "A systematic approach to reading, spelling, writing and grammar." It uses a multi-sensory approach in breaking down words and teaches the "how and why" words are spelled certain ways eliminating rote memorization or guesswork for the student. For example, did you know you can  sing vowels but you can't sing a consonant? (Because your mouth is either partially closed or lips & tongue are in the way, go ahead and try it!) For an emerging reader, this helps them learn to decode the difference between vowels & consonants.

The complete set contains everything you need to fully use this program which is for ages 7 to adult. This means it could be used for emerging readers, those who need some remediation or anyone else in between. This program can also be used for ESL students.


The complete set contains:
  • Essentials Teachers Manual
  • Essentials Student Workbook (in cursive or manuscript, your choice)
  • Spelling Journal
  • Basic Phonogram Flash Cards
  • Spelling Rule Flash Cards
  • Grammar Rule Flash Cards
  • Advanced Phonogram Flash Cards
  • Game Book
  • Game Card Decks
  • Phonogram and Spelling Rule Quick Reference Chart
I admit when I started looking the books over, I was a bit overwhelmed. The teachers manual is a hardback book with over 500 pages. The beginning of the book lists the scope and sequence as well as each lesson broke down and an overview of what each lessons covers. There is a also a section that explains how to use the program with different ages and abilities. You do need to spend time reading a section of the teachers manual to fully understand how to use this program. Once you read over how to teach the lessons, you can start with the first lesson. Each less is broke down and scripted to what you should say & do with your student as well as what they should be answering you back. It also instructs when to use the different flashcards or which page in the game book to go to.

The student workbook is a softcover book with 480 pages. Logic of English recommends starting with cursive though we chose the manual workbook (after reading their explanation of the why behind cursive, I did understand this aspect better and may do things differently with my younger ones). The workbook has everything the student needs to participate in the writing lessons and each section is well marked. The pages are perforated which makes it nice to be able to pull out and hole punch to put into our portfolios.

Each lesson is broken down into 3 parts. Part 1 covers phonograms, exploring sounds and spelling rules. Part 2 of the lesson introduces words through spelling dictation and analysis. Part 3 of the lesson covers grammar, dictation, composition and vocabulary development. All 3 parts of the lesson tie in together working on the same phonograms and vocabulary.

How we used it:

I decided to use this program with my 10 year old son as english in general is not his favorite subject so I was hoping this all-in-one curriculum would help spark some renewed interest (and hey, he loves being able to play games for school!) Looking at the recommended schedule of 1 lesson every 1 to 2 days, I knew we would most likely end up taking it at a slower pace so as not to lose his interest. Plus I wanted to make sure he was truly getting everything as there is a lot to soak in.

Before we started our lesson, I would glance at the teachers manual to see what materials I needed to gather from our flashcard sets. I liked this aspect of having everything laid out for me daily in one place! We took an average of a week and a half to fully complete each lesson, working about 20 minutes a day. This curriculum needs a parent to be heavily involved and the recommendation was to spend up to an hour a day with the student working on the lesson. I honestly don't have that amount of time to devote to one subject for one student when I have several other children to help, little ones to attend to, etc.

Each day we introduced and/or reviewed phonograms, went over the spelling rule we were currently using for that lesson then complete the corresponding workbook pages or filled in the spelling journal. Of course, Eriks' first question each day was do we get to play a game today?! We would either play the game corresponding with the current lesson we were on or we'd go back & play one from a previous lesson. We also completed some of the optional activities that the book suggested.

I really liked the all inclusiveness of this program. I found that using the same words for vocabulary, grammar, spelling, phonetic practice, etc really helped  my son understand spelling and parts of speech much better. An example of how the different subjects are tied together, for his spelling list he writes the words as I dictate them to him. Then next to them he has to list the part of speech then the plural past tense of the word.

Another thing I did was whatever flash cards we were currently introducing as new, I would put them on the fridge and kept them there during the duration we were on that lesson. I figured it was a good way to easily glance at them throughout the day. Not to mention it was a good review for my older children as well!


I think my sons favorite part of the program was the Phonogram and Spelling Game Book. He was able to play games with his siblings which I thought was great as it provided them a review and even taught them a few things as well.


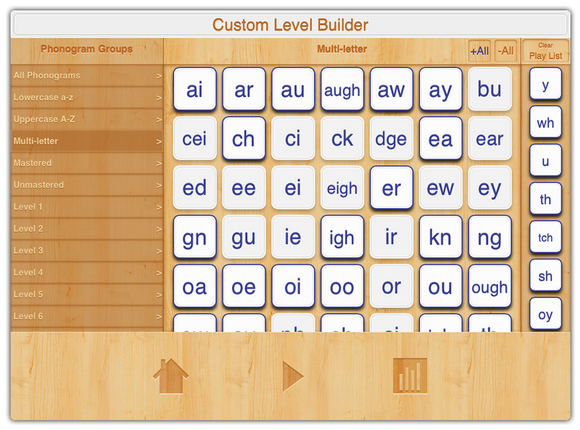
We were also given Phonics with Phonograms App to review as well on the iPad (it's available for the iPhone as well). We found this program an added bonus and another way to reinforce what he was learning in the Essentials program though this app could be used independently of the program. We set up multiple profiles for all my children so they could all take turns reviewing the phonograms. It was easy to set up the profiles then set the levels you wanted each of them to work on. I tied Eriks level onto what he was currently covering in the book. It is a straightforward app where the student simply hears the phonogram pronounced then had to chose the correct phonogram to match the sound they heard. Sometimes less is more! It also tracks the students progress and answers. I think this app is a great way to learn & review the phonograms. In fact my almost 3 year old was wanting a turn to play and I do believe with working with her, she may learn her sounds earlier than any of my other children.

Essentials: Logic of English Complete Set is available for $243 though you can buy individual parts of the set as well.

Phonics with Phonograms App is available for $2.99.

Connect with Logic of English on:
Facebook
Pinterest
You Tube
Twitter

Click to read Crew Reviews
Crew Disclaimer

CTC Math


Let's face it, math can be a challenging subject so I always appreciate extra resources in helping my children master it.  So we were excited to be given the chance to try CTC Math which we came to discover, is a wonderful online math program. We were recently given the 12 month Family Plan to review homeschool math.


The founders (as well as those who teach the lessons) are based from Australia and therefore have a soothing Australian based accent as they present the lessons. There is a choice to choose between Aussie & USA math This program provided us with 1 year of online math teaching from Kindergarten to 12th grade for all of our family. It is a full curriculum for at least grades K-6 and a very comprehensive supplement for middle & high school covering:

-Basic Math/Pre-Algebra
-Algebra 1
-Pre-Calculus
-Algebra 2
-Geometry
-Trigonometry

We are told that CTC Math is working on completing the upper grade level maths so they can be used as stand alone programs rather than just supplemental as they are now.

When I first logged on, I registered each of my children's names. We reviewed grades 5, 6 & basic math/pre-algebra as well as a touch of Kindergarten math with my 2 year old. She is a sponge lately and really enjoyed the beginning lessons that went over numbers 1-5 as well as going over patterns. Because the lessons are short, it kept her attention.


When your child first logs in, they choose the grade, the stream then the topic they want to cover. You can go in chronological order or you can choose for your child to just cover the topics they need the most help in. My children chose to take a break from our regular math curriculum and follow each lesson chronologically fully during the time of review. They did about 2-3 lessons a day for 4-5 days a week. If you are unsure of where to place your child, you can have them take the standard or comprehensive diagnostic test (which is available in the elementary grades) to figure out if they need to complete a certain level or not.

Each lesson was presented in a short video of about 5-10 minutes in length. Afterwards there was an online worksheet they would take to test them on what they just learned.


If there were math problems my children weren't able to figure out in their head, they would work out some of the problems on notebook paper. In addition to the video lessons, there were also games the kids could play or even worksheets to print out. There were certificates they could earn after getting good grades which make a nice contribution to portfolios if you have to complete them. 

There is also a parents login where we could see when each child last logged in, the lessons they completed, the scores they got as well as had the ability to see their results report (summary or detailed). It would've been nice if we could've given them assignments to specific lessons from here. I would sit down with each child to determine what lessons they had to complete, which worked out but I am all about assigning lessons ahead of time if I can to save myself time. If I didn't have the time to log in to check on their progress, no biggie as I was emailed a progress report each week!

This curriculum was easy for each of my kiddos to log in on their own with their own login name (they didn't need my help after the first time). They loved the fact that if they had to stop in the middle of a lesson for whatever reason, it saved their spot and when they logged in again, it would take them right to where they left off at. They also appreciated the simplistic videos and that if they didn't understand something, they would go back and rewatch the video.

All my kiddos gave this curriculum a rave review! They each felt this helped them fill in the blanks to certain areas their regular math was lacking. They loved the ability to skip around to watch & complete lessons in areas they felt they needed extra help and they didn't move on to another lesson until they felt they were ready to. We appreciated the fact that they could each learn at their own pace. In fact, my children said they each plan to continue CTC Math over summer especially while we are on break from school to help them keep up on what they have learned.

At the time of this review, the 12 Month Family Plan for homeschoolers is just $118 which is normally $297. This is for 2+ family members for 12 months! This gives you access to ALL the levels!

You can also find CTC Math on Facebook.

Click to read Crew Reviews
Crew Disclaimer

Mexican Chili Cornbread Casserole

What happens when the flavors of chili, taco & southern cornbread decide to come together? You have this amazing mix of savory & sweet flavors all in one bite! This week, my cooking class made what I call "Mexican Chili Cornbread Casserole". This all-in-one dish is easy to bring together. While I came up with a recipe to follow, you can easily tweak the ingredients to suit your taste buds.

mexican chili cornbread casserole

1 1/3lb of ground meat (this amount is flexible a 1/3lb either way and can be any combo of ground meats, I used beef)
1/2c diced onion
1 small pepper diced
1-2 garlic cloves minced
16oz diced tomato, canned or fresh
6oz tomato paste
1 cup corn
1/2- 1 cup black beans (use whatever amount you prefer)
2 tsp chili powder
1 1/2 tsp cumin
1/2 tsp pepper
1 tsp salt
1/4- 1/2 tsp chili pepper flakes (optional if you like a little spice, we do!)
1/2c shredded cheese
1 box of cornbread mix (like jiffy) plus the ingredients to mix it up (which usually consist of egg & milk)

Saute ground meat, onion, pepper & garlic together. Drain fat. Add in the diced tomato, tomato paste, corn, black beans, chili powder, cumin, pepper, salt & chili flakes. Mix well & cook on low for about 10 minutes. Place into an 8x8 dish. If you like cheese, you could add some on top of this.

Mix cornbread according to directions. Pour on top of meat mixture & spread evenly. Bake at 350 for 30-40 minutes uncovered until cornbread is cooked. Sprinkle about 1/2 cup of cheese on top & place back in oven until melted. If you desire an extra side, serve with some cooked rice.

Titanic Museum

We started studying about the Titanic almost 2 years ago. It was a subject that just fascinated my kids. One of my daughters would often check out books from the library about the Titanic and even did a report on it (which I didn't require her to do!) Sometime last year, we learned that there was a museum dedicated to the Titanic, one in Tennessee and one in Missouri. When we were talking about going to Tennessee this summer, we said that the Titanic Museum was on our list of must do's for sure!

The Titanic museum was easy to get to as it is located on the main road in Pigeon Forge Tennessee. It's easily spotted due to the replica of the ship that makes up part of the museum.

(click to enlarge all photos)

When we walked up to the "boarding station" (White Swan Line), the staff, dressed in outfits like the staff would've worn on the Titanic, greeted us at our entrance. They were super friendly and engaged us in conversation. Before "boarding", you were handed a card that had the name of an actual passenger of the ship along with a short biography about them, their age and what class of the ship they were on. The adults were given a card of an adult (guys got guys, gals got gals), the kids were given a card of a child that was on board. 


At the end of the tour of the museum, you would find out whether you survived the sinking or not.

Oh I forgot to mention, before we left for our trip, I printed out a paper from the Titanic's website that is a scavenger hunt for the kids to do while they walked around the museum. I loved this idea as it kept the kids engaged and it makes a great piece to put in their homeschool portfolio!


By the way, they have a whole section on the website dedicated to education and ways you can incorporate the different subjects into learning about the Titanic.

Back to the tour. . . 

The museum also has the option of purchasing an audio tour while walking throughout the museum. There is so much information to take in just doing the museum alone but the audio tour adds another level to this. You can rent a handheld device to take part in this. 

Throughout the museum there are numbers that you enter to listen to the recording that goes along with the artifact you are looking at or the area of the museum you are in. You hold it up to your ear like a phone to listen to. There is also a children's audio tour and they have a separate number they enter to hear information more geared to their understanding. Our kids took turns between the childrens & adult audio tour. They enjoyed being able to listen on their own. Many times one of them would come up to me and tell me to listen to what they just listened to!

I do want to preface the fact that once we walked into the museum, there was no photography allowed so unfortunately I don't have pictures from the inside (though I was given some pictures from the museum themselves with permission to share here.) I know, it's a bummer not to take photos of the many amazing displays but I do understand why it's not allowed. The museum is made up of many small rooms you walk through and if everyone were taking photos, it would ruin the visit. This was one time we didn't worry about taking pictures but rather focused on soaking in the experience. Another thing I appreciated about the museum is they only allow so many people in at a time so it doesn't get crowded (which is why it's a good idea to order your tickets ahead of time.)


When you first walk in, you are in a room that gives an overview of the Titanic. Each room you went through throughout the museum took you down the chronological timeline from the building of the ship to the sinking of the ship. Not only are facts presented throughout the museum but personal stories of the many of the people involved in the Titanic as well.

I couldn't even begin to tell you which of the rooms were my favorite, they were all wonderful! The kids & I had already known a lot about the Titanic but we walked away learning even more. In fact, there was a room dedicated to Father Frank Browne who took the only photographs that were saved from the Titanic. How did this happen? He was on the maiden voyage of the Titanic when it left from Southampton and stopped in Queensland, Ireland where he disembarked and didn't finish the journey across the atlantic. I never knew this! The room displayed many of the photos he took on board, including the only picture of the captain on the ship.


Scattered throughout the museum were actual artifacts recovered from the Titanic. Seeing these items just brought the Titanic to life for me as I tried to envision those whom these items belonged to.
A purse handle & bracelet

One of the deck chairs

Another neat feature of the museum is they have rooms set up to recreate what different areas of the ship had looked like.

Actual size of a 3rd class cabin

1st class stateroom

There were displays of the clothing they would've worn, what one of the ships hallways would've looked like, etc. Another interesting room was solely made up of artifacts and information from the filming of the movie Titanic. There were signed pieces from the actors, behind the scenes pictures as well as some of the actual props they used for the making of the movie. They even explained how they shot certain parts of the movie.

Before you go to the second floor of the museum, you are brought to a true-to-size replica of the infamous grand staircase that you actually walk up to get to the next floor. (there is an elevator for those who need it). 


Before advancing to the second floor, we were gathered in a group by a very engaging employee named Ron who shared facts about this beautiful staircase. In fact, before he started his presentation, he noticed my family & the friends with us and asked about our group. I mentioned we were homeschoolers so he said before I go to the next floor, to see him as he had some information to share. He gave me a website that contains wealth of knowledge about the Titanic (it seriously is an awesome resource!) I appreciated he took the time to talk to us.

As if all this wasn't enough, there were different interactive displays as well. There was a replica of a hall & stairwell and when you pushed the button, water began to rush into it like it would've on the ship. It started out slow but eventually began to pour in. I can't imagine what those people thought as they saw that. 

There was a tot Titanic area for the littlest ones to explore. 

The sloping decks were also neat to try out (I had Ava in the moby wrap on me so I didn't try them but everyone else with us did).


I think one of our favorite interactive places was when we walked "outside" of the ship onto what was a simulation of that fateful night. It was dark and 32 degrees in that room. To the side was an actual piece of iceburg we could feel then we moved to the front of the ship where we could put our hand into water that was the exact temp of the ocean water when the ship sank, a freezing 28 degrees.


Oh my goodness, the pain you felt in your hand when you put it into the water was insane!! Before we put our hand in, the employee that was there encouraged us to not just do a quick dip but move our hand around and keep it there as long as possible. Wow, I can't even imagine what those people felt as they were plunged fully into that water. He said within 2-4 minutes after being submerged, hypothermia set in and  they were unconscious then within 10-20 minutes they died.

At the end of the museum, we came to the memorial room where every passenger of the ship was listed. It was there we learned our fate, if we survived or not.


We discovered Kevin & I both died and all the kids lived.

At the end of the museum, there is a gift shop. There seriously is so much more to this museum I didn't mention. I know we could easily go back a second time and discover things we overlooked this past time. There was so much to learn & discover here, by far it was our most favorite museum we've been to. In fact, anytime someone has asked my kids what their favorite thing they did in Tennessee (next to visiting our friends) they said it was seeing this museum for sure!

You can order tickets ahead of time. They even have a reasonably priced family pass for 2 adults & 4 kids ($60.58 plus tax), group rates as well as special homeschool pricing. If you are in the area, I would definitely recommend making time to tour this amazing museum!!


My family was given tickets and audio tour in order to facilitate an honest review. All opinions expressed are those of myself & family. No other compensation was given. 

Ripley's Aquarium of the Smokies

We decided while in Tennessee to do some field trips. One of the places we wanted to see was Ripley's Aquarium of the Smokies, so on Monday August 5th we headed to Gatlinburg where the aquarium was located. It was easy to get to the aquarium as it was just a skip from Pigeon Forge and on the main road as we got to Gatlinburg.

(you can click on all pictures to enlarge)

We followed the signs for parking which happened to be in a parking garage behind the aquarium which is a no go for us being in a 12 passenger van. So I hopped out and went to guest services to inquire about where else we could park (it's a busy little town so I would've had no clue where else we could've parked). The gal at guest services said we could park in the bus parking right behind the building, perfect!!

Let me tell ya, this place is bigger inside that you realize! When you first walk in, you can see you are on what looks like the second floor with an open atrium overlooking part of the floor below.


(this pic taken by one of my kids)

The way this aquarium was laid out was in a natural flow pattern, you didn't have to wonder what to go see first, you just kept walking and were guided to see all the displays and exhibits. In my opinion, this kept crowding limited as everyone flowed through the aquarium in the exact same pattern. Everything is stroller & wheelchair family as there aren't any steps between exhibits, just ramps which I was thankful for as we had 1 of our little ones in a stroller. Also when we arrived, we were handed a schedule of activities that were taking place throughout the day that listed times & locations of different diving and feeding shows. We were so busy seeing the displays that it never timed out for us to hit a show.

I can't begin to list all the cool aquatic displays we saw, so many neat fish from small to huge! We appreciated that by each of the tanks was a plaque that told you what you were looking at and some facts about each animal. The homeschooling mom in me loves when we can throw in some education along with the fun side of things!


There was a neat section of the aquarium that as you walked through, you had the feeling of being under water just by the way the lighting was. (this picture doesn't do it justice).


Eventually another area we arrived at was a huge tank where you could look down and see sharks & stingrays (there might've been other animals but that's what we saw while standing there.)


Even my recently turned 2 year old loved seeing all the fish! She would make fish faces and get excited each time she saw new ones!

Not only are there display tanks but several interactive areas. There was one section where we saw & learned how the aquarium filters their water, an area where you could touch & pick up horseshoe crabs, a large fish that had buttons on the different organs that lit up and told you about them,  tanks where the kids could go in the center & put their head up the middle simulating the feeling of being in the tank surrounded by fish.

The tank full of sting rays were fun to watch as they swam around. There were all different sizes and even different colored ones. A few of them would swim right up against the glass almost as if they were showing off.

There was also 1 room dedicated to a dinosaur display. From what I gathered, this was something new and might only be there for a limited time (though I am not for sure on that part of it). We weren't in there too long as my 2 year old wasn't quite sure what to make of the huge moving dinosaurs and roaring sounds. But from the little I saw, there was factual displays along with the animatronics and some video clips. (funny, as I'm sitting here writing this & she sees the dino picture, she is roaring so she obviously remembers what she saw!!)


When we got about two-thirds of the way through the aquarium, we came across a cafe area. While we weren't hungry and didn't stop, I did take a glance at the menu and they had several meal deals listed for both adults & children as well as a place to sit down to eat.

Towards the end of the aquarium there was a penguin playhouse. You saw a bunch of them inside, where there was even a place to stick your head up in the middle of their habitat! You then could walk outside on a porch that overlooked downtown Gatlinburg but it also had a display of the penguins swimming in water where you were eye level with the water. The red bands on their arms showed the name of each penguin. There was also a small nursery that houses baby penguins. There was one there while we were there but due to the glass, I couldn't get a good picture as the penguin was towards the back of the room.


(yes, that's my 2 yr old using my phone to take pictures of the penguin swimming right in front of her!)

I saved our most favorite part of the aquarium to mention last. I knew going into it that there was an underwater tunnel you can walk through to see sharks and other fish. It sounded neat but I didn't expect a whole lot. Well let me tell ya, it blew us away! First of all, the tunnel contains a conveyor belt you can stand on (and the stroller fit as well) so you can concentrate on just looking up and all around and not worry about walking (and potentially tripping or running into someone!) though there is also a place to walk if you don't want to stand on the conveyor belt. And the second part was how long this tunnel went. It weaved all around this tank and lasted for quite awhile, which was a pleasant surprise! There was no lack of sharks, we saw plenty swim right against not only the glass next to us but right above our heads as well. We saw plenty of other fish as well.


(I love how Olivia is looking up at the sharks here)

A huge jellyfish, Ava & I in front of the tank overlooking the sharks, a stingray in stingray bay that you could lean over the side and touch, and 2 huge Japanese fighting crabs (seriously, from leg to leg they were like 3 feet wide!)

At the end of the aquarium there is a large gift shop before you exit the building.

We really enjoyed our time at Ripley's Aquarium and loved seeing all the different aquatic life, it was definitely worth the time we spent there! (They even have a facebook page you can check out.) If you are vacationing anywhere near Gatlinburg or Pigeon Forge TN, check out this aquarium for a fun family day! (They also have an aquarium in Myrtle Beach and one opening next month in Canada). 

Stop back soon for more posts on the rest of our Tennessee trip!

My family was given tickets to this aquarium in order to facilitate this review of my honest opinions. No other compensation was given. All opinions and pictures are those of mine & my family. This post & photos are protected under the copyright law.