Gluten Free Peach Cobbler Dessert

Ahh 'tis the season of peaches right now! I was lucky to stumble across a deal of 1/2 a bushel of peaches for just $2.70 yesterday. Of course I knew I had to make a warm dessert using them and since some in our family are gluten free, I set out to make the entire dessert gluten free. Of course a warm cobbler is not complete without vanilla ice cream so I dug out our ice cream maker and made a batch of vanilla ice cream to serve alongside the warm cobbler.

This recipe was a hit in our family and one I am sure we will make many times over!


Filling:
Using a glass 9x9 pan, fill with enough peaches (approximately 10-14)
1/4 cup sugar
1/4 brown sugar
3/4 tsp cinnamon
sprinkle with xanthan gum (about 1/2 tsp, I didn't measure) or use 1 tsp cornstarch

Topping:
3/4 cup sugar
3/4 tsp cinnamon
1 large egg
1 cup gluten free baking flour
1/2 cup butter, melted

Preheat oven to 350. For the filling, slice up the peaches and mix the other ingredients with the peaches in the baking dish.

For the topping, in a separate dish, mix together the sugar, cinnamon, egg & GF baking flour until it forms crumbs. If it seems extra dry, add a smidgen of water to help form clumps. Sprinkle this over the peaches. Take the melted butter and evenly drizzle over the topping. Bake for about 40 minutes or until golden brown and bubbling.

I actually made double this amount in a 9x13 pan but I didn't quite double the sugar in both the filling & topping. I honestly didn't measure most of my seasonings as I rarely do but this is a good estimate. Feel free to adjust to your tastes!


Horizons Preschool Curriculum

It's hard to believe my precious Olivia is of preschool age already and really itching to "do school" like her older siblings. I never did a formal preschool program with my other children but I recently had the chance to review Horizons Preschool Curriculum Set from Alpha Omega Publications (AOP).


I have used early elementary math curriculum in the past from AOP and we enjoyed it so we were excited to see just what their Preschool Curriculum entailed. When first opening the package, I was overwhelmed at the amount of curriculum that we received! What all was included was:

-2 student books (over 300 pages each!)
-2 teacher manuals (again, over 300 pages each!)
-large loose leaf packet of resource materials and lesson resources (286 pages)
-an audio CD of 17 songs

click on photos to enlarge


The 2 student notebooks contain 180 lessons worth of workbooks pages that are on perforated pages that can be torn out. Many of the pages are printed in bright, full color and involve activities such as tracing, coloring and cutting just to name a few.

The 2 teachers manuals spell out a ton of activities that can be completed each day. I will state that it was obviously from the beginning as I looked over the curriculum, that this set seems to be geared towards a Christian preschool moreso than a single child homeschool. That doesn't mean it can't be used in a homeschool setting, it's just that there are a few things you would need to adapt and do a little differently.

An excerpt from the teachers manual (click on to enlarge)


The teachers manual lists a schedule for each day based on whether you do a full day of preschool or a half day. Either way, there are SO many activities to complete there was just no way we could do them all  but this gave us variety and plenty to choose from and the ability to switch it up. Each day varied the generic types of topics covered. Some of these involved:

  • Bible Lesson
  • Social Studies
  • Language Arts
  • Phonics
  • Reading
  • Writing
  • Math
  • Colors
  • Story Time
  • Arts & Crafts
  • Gym
  • Homework
  • Music
  • Memory Verse
  • Health & Safety
The neat thing is within each lesson, the different topics all connected and flowed between each other. The curriculum is broken down into 5 days of lessons each week. On days 1, 3 & 5, new concepts are presented with days 2 & 4 being review days. This worked out well for us to just do 3 lessons a week as I didn't want to overwhelm my daughter. Each day detailed what workbooks pages to have the student complete as well as what lesson resource pages to have ready to accompany the lesson. 

During the review period, my daughter worked on learning her letters and tracing them (though this was a review for her as she is already writing most of her alphabet) as well as counting, learning shapes & numbers, matching objects, etc.

The resource packet came in loose pages. Many of these cards would be great to laminate to use as flash cards for the student. I wanted to keep them all organized so I 3 hole punched the pages and put them in a binder. I would've liked a tab to separate the resource material and lesson resources so I stuck a sticky tab between the 2 to make it easier to find. Sometimes when lessons called for a certain page, it was hard to find and would've been made easier if the teacher manual had included a page number to locate the page faster.

A few pages from the lesson resource pages


How we used it:

Because there is just SO much material to cover, I picked things out each day that I knew my daughter would enjoy. We read the Bible lesson and then worked on a few activities, making sure we did each lesson student workbook pages as that was important to her. Sometimes we referenced the extra resource pages but it all depended on what it was covering as some of the lessons were more review for her.

Olivia working on a lesson (notice she already knows how to write her name!)


I really did appreciate how the teachers manual had SO much laid out for you in the beginning. It stated which songs you would use with each lesson, several pages worth of reading book suggestions as well as a list of supplies needed for each week. Also listed at a glance was the memory verse for each week and the lyrics to all the songs on the CD.

This preschool program is well thought out and has exceptionally detailed lesson plans as well as prep plans. It more than enough for a homeschool preschooler and would be full of plans for a traditional brick and mortar preschool program!

Connect with Alpha Omega Publications:
Facebook
Google +
Twitter
Pinterest
Instagram

Alpha Omega Review
Crew Disclaimer

Back to Homeschool- Preparing for the New School Year

Whether you are new to homeschooling or have been at it for several years, you will have to take time to plan for your upcoming school year. Usually as I am winding down our school year, I already have an idea of what I plan to do for the following year.


I start out making a list of subjects I want to cover with each child. (Your state may have guidelines as to what each grade needs to cover so that is a good place to start if you are unsure). Once I know what subjects we want to work on, I then list the specific curriculum I want to use for each subject. If I am unsure of what curriculum I want to use, I ask others homeschooling moms who have kids older than mine what they have used or would recommend. I also check out the Schoolhouse Review Crew for curriculum ideas.

Once I have figured out what curricula I want to use for all my children, I then start scouring the web for the best prices. Granted, some of the curriculum I already own and just pass it down from one child to another but other things (like consumable workbooks) I have to buy. It's a good idea to do this process earlier in the summer so you have time to look around for deals. I first reference an online curriculum store so I know what the books cost brand new as I obviously don't want to pay more for a used book than it would cost brand new. Then I typically check out Amazon's used books, ebay & Homeschool Classifieds to see what deals I can find. I admit it feels like Christmas morning as all the curriculum starts rolling in!

Once I have the curriculum in my hands, I take a look to see if there is already a schedule laid out for the year (my most favorite curriculums do this which in my opinion, saves me a TON of work!) If there isn't a schedule included, I try to figure out how much to cover each week to complete it all by the end of the year. Some homeschoolers plan out in detail their entire year but I don't. I plan in detail week by week that way it allows wiggle room when life happens and we need to make schedule adjustments.

In addition to preparing curriculum, I also get school supplies for each child. Usually by mid-summer, most stores have all their back-to-school products out. I highly recommend stocking up at this time because if you run out of something later in the school year, you end up paying a higher price for it. Some things we typically purchase each year are:
  • 1 subject notebooks (they usually average $.17-$.25 each so I get a big stack) 
  • glue sticks and some liquid glue
  • pencils
  • crayons/colored pencils
  • scissors (as some seem to go missing from our previous year)
  • staples
  • tape
What are some ways YOU prepare for your new school year?

Back to Homeschool Blog Hop

Don't forget to stop by and check out the the many posts other homeschool moms are sharing this week!

This weeks blog hop is being sponsored by the Schoolhouse Review Crew & Homeschool Blogging Connection.

Back to Homeschool Upcoming Blog Hop!

Where in the WORLD has summer gone? I can't believe we are well into August already. For me, August means that we are almost to the end of warm weather and that it's time to start school. It also means that it's our annual Back to Homeschool Blog Hop that I've participated in the last few years. So stop back and check out all the great posts everyone will be sharing this coming week!


Back to Homeschool Blog Hop

Mark your calendars - 10 to 14 August - it's time for this years Homeschool Blog Hop. The Schoolhouse Review Crew will be joining forces with Homeschool Connections to bring you a week full of back to school encouragement.

We have 55 homeschool Mom's sharing their combined wisdom and insights covering everything Homeschool related. That's 275 posts of encouragement and information just for you!

Meet Your Back to Homeschool Blog Hop Hosts


Marcy @ Ben and Me

Rebecca @ Raventhreads
Annette @ In All You Do

Aurie @ Our Good Life
Jennifer @ A Peace of Mind
Katie @ DailyLife
Melissa @ Mom's Plans
Annette @ A Net In Time


Crystal @ Crystal Starr
Shawna @ Tenacity Divine
Jacquelin @ A Stable Beginning 
Leah Courtney @ As We Walk Along the Road

UnLock Pre-Alebra

Teaching elementary math over the years was no big deal. Fast forward to middle school & high school and well, I needed to brush up on my math to be able to help the kids out. But with several children close in age, there isn't always enough of my math skills to go around so I looked for math curriculum that could do the teaching FOR me. We recently had the chance to review UnLock Pre-Algebra from UnLock Math.


What is it?

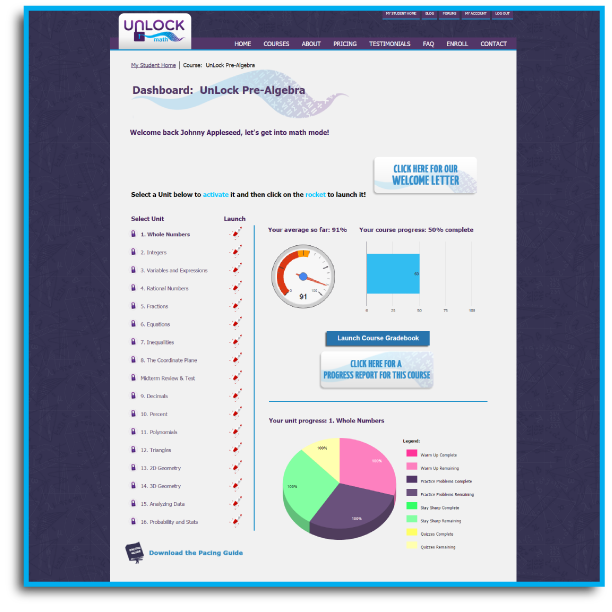
UnLock Pre-Algebra is a complete online homeschool math course taught by Alesia Blackwood, a former math teacher and fellow homeschool mom. We have used other math curriculum's in the past that use a video to teach but we have to say that the way Alesia teaches has been by far the most engaging, easy to understand teacher we've worked with for math! You don't just hear her voice for the lessons but you actually see her as she demonstrates problems on a white board! She does all the work for you in not only teaching pre-algebra in a way that makes sense, but lesson plans are already laid out and the grading & record keeping is taken care of for you right online. I LOVE curriculum that makes my busy life simpler.

There are 16 units with each unit containing a variety of lessons & quizzes as well as a midterm quiz and final exam.

How does it work?

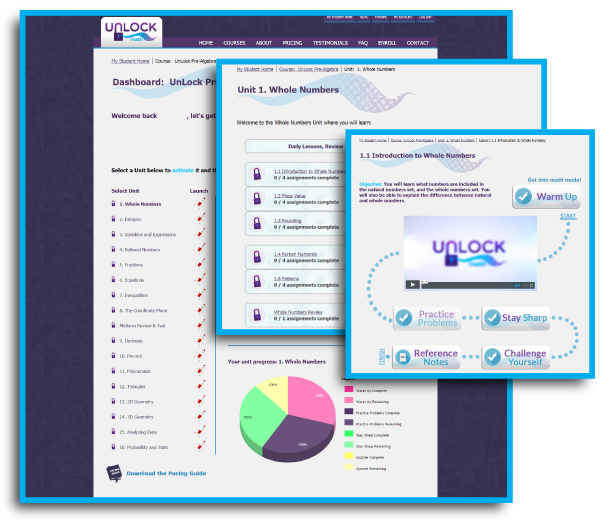
Once the student logs in, they are brought to their dashboard that shows the list of lessons (and which ones they've completed), their average grade, a link to check out their gradebook as well as progress report. If you aren't sure how long your child should take on each lesson/unit, there is a pacing guide that you can download that tells you approximately how many days they should spend on each. I felt this was a great idea and lets me know if my son was on target or needed some extra help.

Click on photo to enlarge.


Once the student clicks on which unit they are on, it takes them into a page that lists all the lessons for that unit and shows which ones they have complete. Upon selecting the next lesson, they are set to begin that days lessons which starts out with a warm up session of 5 math problems. Once those are complete, they move on to watch the math video. Alesia teaches each concept in small, easy to understand pieces so it isn't overwhelming. The videos vary in length, from what I've seen 3-10 minutes each.

After the video, the student then completes about 10 practice problems that goes over what they just learned in this lesson. These problems are automatically graded. If the student needs more practice, the program automatically generates new problems for them to complete (how cool is that!!) The other awesome feature that I adore about this program is the fact that after the student completes the practice problems, they can they get an explanation on each problem which especially comes in handy if they got one wrong. Many other programs just show the student WHAT they got wrong and not WHY it was wrong and how to do it correctly. I think this is huge in helping a student understand the concepts.

Next the student moves onto the stay sharp section which reviews concepts they learned about in previous lessons. This helps them retain what they have already learned.

UnLock Pre-Algebra


Finally they end with the challenge yourself section which is a way to earn extra credit. To wrap it all up, you then have the ability to print out the reference notes for the lesson. The notes go over what they learned in the lesson as well as new vocabulary they might have learned. If you print this off, it would be best to put them in a notebook so your child could reference them in future lessons if they need help with something they previously learned.

As if this curriculum in itself isn't already great, their customer support deserves a huge mention as well. You can have a wonderful program but if you find yourself needing help, where can you turn to? Let's just say Matthew (Alesia's husband) is wonderful to communicate with by email and even though we (so far) haven't needed Alesia's help, he has assured us if at any point we need help, Alesia is there for us through either email or phone support! That to me speaks volumes knowing I have a math teacher ready to step in if we need the extra support.

Our thoughts?

UnLock Pre-Algebra is a well thought out online math program that covers everything I would want in a math curriculum. My son typically would've waited another year before starting pre-algebra but because of how well this program dissected the concepts, he plans to complete the program this year for his math curriculum. He averaged completing 1 lesson a day during the review period. I would love to see Alesia eventually role out other levels in math down the road!

If this program sounds like something that would work with your family, feel free to use this link to save $50 on purchasing UnLock Pre-Algebra or Algebra 1.

Connect with UnLock Math:
Facebook
Twitter
Pinterest
Google+
Instagram

UnLock Math Review

Crew Disclaimer

"You Wouldn't Cry For Me Today"

This song hits home for me right now and I imagine Noah hugging me as he whispers these words in my ear. I am thankful he is experiencing the joys of Heaven but man, we miss him big time here!!! There is no way to describe the hole in my heart and the tears that continue to fall as we reflect on the last 5yrs without our son/brother.


"You Wouldn't Cry for Me Today"

All you saw was pain
All you saw was rain
But you should see me now
Moments filled with tears
Lasted all those years
Disappeared somehow
You never said goodbye
On your knees you cry
You're still asking why, but

Blue has never been bluer
True has never been truer
Honey never tasted so sweet
There's a song in the breeze
A million voices in praise
A rose has never smelled redder
The sun has never been brighter
If I could find the right words to say
If you could look at my face
If you could just see this place
You wouldn't cry for me today

What you think you see
Isn't really me
I'm already home
You've got to lay it down
'Cause Jesus holds me now
And I am not alone
Your faith is wearing thin
But I am watching Him
And He's holding you too, and

[Chorus]

What may seem like years will just be a moment
Oh, the day will come when I'll show you where you're going
I can't wait to show you that

[Chorus]

CursiveLogic

Let's face it, cursive handwriting is a dying art anymore. Despite that, I still teach my children cursive, even if they don't continue to use it, I want them to be able to read it. We've used many approaches to teaching cursive over the years so we were excited to try out a totally new concept using the CursiveLogic Workbook from CursiveLogic.

Cursive Logic


The workbook is a 96 page, consumable spiral bound workbook that contains both the teaching instructions for the parent to instruct as well as the student pages. There are even 3 laminated pages in the back where the student can keep practicing their work while reusing it again and again.

Their approach to teaching cursive is unlike anything I have ever come across. In fact though, their innovative approach makes complete sense. They teach the letters by shape and not in alphabetical order. There is also a verbal task analysis that helps the student learn verbally how to write each letter shape. In addition, the different letter shapes are grouped by color & shape, all while helping the student to group the same shaped letters together.

From CursiveLogic's Website:

"Letters grouped by shape ― Four foundational shapes underlie the entire lowercase alphabet. Rather than teaching the letters alphabetically, CursiveLogic groups the lowercase alphabet into four groups based on the shape of the initial stroke of the letters and teaches all of the similarly-shaped letters in a single lesson.  Letters are also taught in a specific order that reinforces the pattern.  By teaching all of the similar letters together, CursiveLogic captures the natural synergy of the alphabet itself, allowing each letter in the series to reinforce the proper formation of all the others.


Letter strings ― CursiveLogic captures the flow of cursive by teaching all of the similarly shaped letters in a connected string rather than as individual letters. CursiveLogic’s letter strings teach students to connect letters from the first lesson, allowing students to internalize the flow of cursive handwriting even before they have learned all 26 letters.

CursiveLogic also uses visual and auditory cues to reinforce the shape patterns:

Theme colors — Each shape string has a color—orange ovals, lime loops, silver swings, and mauve mounds—that reinforces the formation of the basic common shape.


Verbal task analysis — Students learn a simple, rhythmical chant that describes the path of the writing instrument as the letter shapes are formed.  The process of verbally describing a motor task while performing it aids the acquisition of new motor skills."

The main focus of the book is to teach lower case letters but they do touch on forming each capital letter. There is no set schedule as to how to go through this book. I had my son who was new to cursive writing work on one page a day. I was amazed at how quickly he was picking up the skills since he never had previous instruction in cursive. He found the instructions easy to follow and actually enjoyed practicing his writing every day. I felt he picked up on cursive using this method quicker than my older children did in a different way that I had taught them.

CursiveLogic is afforable at only $29!

Connect with CursiveLogic via:

CursiveLogic Review
Crew Disclaimer

In Honor of Noah's 5th Birthday. . .

It's hard to believe how quickly Noah's 5th birthday is approaching (July 13th). I know I've been suppressing my grief to a degree and am in denial that we are rapidly approaching another milestone without my son though I'm sure it is all going to crash in on me soon enough. It always does.

The cake I made for Noah's 1st Birthday


He's turning 5.

He should be starting homeschool Kindergarten this fall.

He would probably be writing his name by now.

I could've signed him up to finally play fall soccer.

And so much more, the list is endless.

In honor of Noah's birthday, I would love to remember YOUR child(ren) that have died. I want to write their names on a sky lantern that we will release the week of Noah's birthday (13th) and home-going (14th).


I will take a picture of each child's name as I write it and put it together in a video montage that I plan to later share here. All you have to do is go fill out their name on this form.

Secondly, I can't tell you how much it means to see Noah's name written out or have it spoken out loud! It truly is a priceless gift to all of us! I have a name album for Noah that we started several years ago that many have contributed photos to. I would love for you to take a minute and send us a photo of Noah's name that I can add to his album. You can directly post it on Treasuring Life's Blessings wall and I will put it in his album or message it to me through my page there. (you can also drop me a note here and I can give you an email address to send the photo to).

We covet your thoughts and prayers as we enter the upcoming time of reflection on Noah's brief but miraculous life, celebrating all that he is while mourning that he isn't in our arms.

Please feel free to share this post so I can remember as many babies as possible and thank you for participating!


Visiting my BFF in Alabama!

Since I've started this blog over 5 years ago, I have been blessed to come to know some dear women who came across my blog for many personal reasons and contacted me via my contact button. We went on to email and really connect deeply. We are talking women from all over the US and other countries, it seriously blows my mind! Several of these gals I've even had the privilege to meet in person not just once but several times.

One of these friends is my dear "sister" Ashlee whom I just had the chance to spend time with again for the 3rd time recently. She lives in Alabama and with me in Pennsylvania, well, there is no way to do a day trip unfortunately via driving so we have to rely on flying. She came across my blog several years ago, we emailed for quite awhile then started texting every day. She has a son who is exactly 4 weeks younger than Ava so we got to walk with each other during our pregnancies.

Ava & I finally flew down to meet and stay with her in February of 2014. It was so great to be able to finally meet and talk face to face!

Then this past Christmas, I won a contest that gave Ashlee a plane ticket to fly up and stay with us! This was her first time flying and being this far north.

I had some air miles to use and wanted to fly down to see her before Ava turned 2 (since she was able to fly free) so we flew down to stay with Ashlee this past May.

Because we had a 5:40am flight, Ava and I went and stayed at a hotel near the airport the night before. Here she is enjoying a cookie before going to bed,

Headed to her house after flying into Pensacola, Florida

When we got to their home, Ashlee had a Mickey & Minnie balloon for each of them to play with. They spent SO much time batting them around and those suckers were still standing when we left!


Outside water fun and eating a snack!


 Because the weather was warmer this visit, we even went and spent the day at the beach. It was my first time being in the gulf (and she is SO lucky to only live an hour from the beach!)

The sign says Florida to the left & Mississippi to the right. Bottom left pic is Ava chilling and eating a snack while CJ on the right is passed out asleep!


I also got to experience my first Frogmore stew and I was in LOVE!!!! For those wondering what it is, it's a crawfish, shrimp, sausage, potato & corn boil (meaning everything is cooked together in one big pot with this kicking seasoning). The seafood was caught fresh THE DAY we had it, amazing! I had never had such fresh seafood before (nor had I ever tried crawfish before). I hope to try my hand at making this sometime as I know my kids would enjoy it.


I also had grits for the first time as well and promptly came home and bought some to make for my kids.

Sitting in the wagon together and a cart at Target. A funny story, Ava NEVER took a pacifier before but when she saw CJ with one, she had to steel one of his to use while we were there, silly girl!

Ava loves wrestling with her sister so she had to do so with CJ. And they enjoyed playing with the Kindle together.

Because both their 2nd birthdays were coming up and they wouldn't get to celebrate together, we tried to do a birthday photo of them together. CJ's party theme is Mickey Mouse so we borrowed his party ears though it was hard to get them to both grin together at the same time (ironically I ended up making Ava a Minnie Mouse cake for her birthday!)

I love this girl and just wished we lived closer together!!

There was only one restaurant in the Pensacola airport and after finding out our flight was delayed, I ordered some fries and thanks to the free wi-fi, I was able to tap into our home tv (through a special app I have) and pulled up Disney to entertain her. The bottom photo was an EMS truck waiting for a patient to exit the flight I was waiting for in Tennessee.

Our flight didn't land till around midnight and we finally pulled into home at 2am. We had a wonderful trip and can't wait to spend time again with Ashlee & CJ!!

February 2014
January 2015
May 2015

SmartKidz Media Library for Homeschoolers


My children love to utilize online media both for schooling as well as just for fun but I am super cautious as to what they access and can view. We recently had the chance to review SmartKidz Media Library for Homeschoolers from SmartKidz Media. This is an online digital streaming resource that is safe for kids to access! The media resources come in the form of videos, games, e-books and even study guides that can be accessed on any device that has internet. This was a big plus as my children could all access the website at the same time on different devices if they wanted.
When you first log in, you'll notice tabs at the top of the page. These tabs break down the different areas of the website and include:

  • World of Discovery- This breaks down even further in different video subjects such as animals, history, science, travel, exercise videos, documentaries, etc. This was one of our favorite areas!

Click on photo to enlarge

  • Music & Fine Arts- This section has classical & cultural music, blues & jazz as well as relaxation music.
  • The Mighty E-Book Collection- In this section you'll find all sorts of animated books that are broken down into different sections based on age as well as subject such as Aesop's Fables, science, reading readiness, etc. There's even a section that has classic sing-along songs. A special note about the books in this area is that they are read to the child and as they are being read, it shows the highlighted word as it's being read so it makes it easier for your child to follow along with.
  • Baby Signs Program- This is a great resource if you are teaching your baby sign language! There is even a section about potty training.


  • My Animal Family Program- This section is broken down into different categories- video storybook, fun facts and story songs. The video storybook was our favorite as it showed baby animals in their own environments.
  • Quick Find Study Guides-This section is a large resource in helping kids in different subjects such as math (which covers basic math all the way to trigonometry), science, social studies, language arts. They also show that accounting and foreign languages is coming soon.

This is a screen shot when I clicked on Language Arts. You can see the different topics that it covers.

When you choose your topic and click on it, you get a note card view that tells you the definition and gives examples.

  • Easy Learning for Special Needs- This section was developed by special need educators and therapists to help teach person, social and coping skills. The books are presented 2 different ways. "Hear the Book" plays the entire book as a movie and "Interactive" read the book page by page, highlighting the words and has the child clicking "next" to turn the page. The subjects in this section cover everyday life, going places, holidays and celebrations, sequencing, arts & science and sing-a-long story songs.
  • Living Skills Songs- This section is listed as coming soon but their description says they will have fun & lively songs that help teach children life skills.
  • Ready, Set, Sing- This section has over 200 songs that you can stream. This is handy to play on your phone in the car for the kids!
  • Fun Zone- This area has interactive games, jokes & riddles as well as puzzles.


As you can see, there is such a wealth of knowledge on this website, I only shared about just a small fraction. SmartKidz media is also continuing to add on more content to their website which they let their subscribers know about in their monthly newsletter. The website is easy to use, just click and go!

Our family is enjoying the subscription. We typically use the website on the iPad or laptop though we do have the ability to hook up our computer to the tv to stream the videos that way. We enjoyed Miracles of Nature: Part 4 that covers the Caribbean as we have been to some of those islands. My history loving son enjoyed the videos on World War 2. My older children are looking forward to utilizing the study guides when we start back with our regular schooling. We typically borrowed educational videos from the library, so I am enjoying having a selection available any time we want saving me a trip out to the library (and potentially not returning it on time!)

If this sounds like a subscription your family would enjoy, you can try out their 2 week Free Trial.


SmartKidz Media Review
Crew Disclaimer

Zucchini Lasagna

Zucchini Lasagna


I've had a hankering for a good ole lasagna but I have been doing good in not consuming unnecessary sugars and carbs lately. (in doing some reading & research, our bodies are meant to eat the way God created earth, raw & natural).  Now with that in mind, I have always eaten healthy. I don't have a sweet tooth and watch portions sizes but there were still adjustments I could  make to be even healthier. Wouldn't ya know it, as I easily switched things up, 7 pounds melted off of me in no time (and I don't have much to lose but was thankful that came off effortlessly).

Anyway, I've used zucchini in recipes before as a substitute so I figured changing up my previous lasagna would work pretty well. So I was excited to give this a chance. I didn't have a recipe to follow. I just knew to slice the zucchini (from my garden) in thin, long slices. Then to sprinkle it with salt to draw out excess water. I then let it sit in a colander for awhile as I worked on the rest of my prep.


After it sat for awhile, I rinsed it then blotted each slice dry. Then I tossed the slices on the grill for about 3 minutes each side, enough to give a nice grill mark & add a bit of firmness to the slices. From there, I made my lasagna just like I would with noodles except I substituted the zucchini for the noodles. I did make a small pan of "regular" lasagna" for Kevin in case he didn't want to eat this kind.


I was so busy prepping it, I forgot to take pics as I was assembling it. But here is a quick shot of it from the side. If you truly wanted to make the zucchini look like noodles, then just trim the skin so you don't have any green showing. I knew we wouldn't care and it's some extra nutrients with the skin on.

I baked it like I would my usual lasagna. At the end, I pulled off the foil and added a bit more cheese to the top to finish baking.

Let me just say, what.a.hit!!!!! I couldn't believe how quickly this pan got devoured! In fact, I was pleasantly surprised Kevin even ate some of this and he said it wasn't too bad!   Thankfully he has come far from the bland food he grew up with in the almost 14 years we've been married!

Not the greatest pic but I tried to quick take one before it got scarfed up! I am SO making this again! 

In fact, this was the 3rd "new" recipe I've made in the last 2 days. Stay tuned for more new recipes in the coming days (all from my garden!)

I learned that courage was not the absence of fear, but the triumph over it. The brave man is not he who does not feel afraid, but he who conquers that fear.
-Nelson Mandela

 Be strong and courageous. Do not be afraid or terrified because of them, for the Lord your God goes with you; he will never leave you nor forsake you.”
Deut 31:6


Institute For Excellence in Writing-SWI

Over the years, I have found that teaching writing to my girls to not to be too terribly difficult. I myself enjoy writing so I was left scratching my head when it came time for my son to write reports and stories and he found it challenging. I have tried many different programs that left both of us frustrated. I had heard of Institute For Excellence in Writing (IEW) but never really looked into much. That is until I recently had the chance to review Teaching Writing: Structure and Style (TWSS) as well as Student Writing Intensive: Level B (SWI).


Let me preface this saying that this is a HUGE program and I am only scratching the surface with this review. Even in doing my research prior to receiving this curriculum, I still was amazed all that this program covers once I had it in my hands.

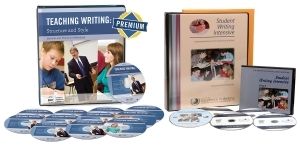
Teaching Writing: Structure and Style is actually a program for the teacher/parent so they know HOW to teach this program. This is the foundation to this curriculum. What you receive is 12 DVD's with over 14 hours of instruction from the IEW director, Andrew Pudewa. The first 9 DVD's cover the entire 9 unit course and the last 3 DVD's are video clips of Andrew in action teaching all the levels (K-12th grade). The DVD's come in a nice leather case with the seminars recently revised and updated. These discs cover:

  • Introducing Structural Models
  • Introducing Stylistic Techniques
  • Retelling Narrative Stories
  • Summarizing a Reference
  • Writing from Pictures
  • Summarizing Mulitple References
  • Inventive Writing
  • Formal Essay Models
  • Formal Critiques and Writing About Literature
as well as 3 other discs giving demonstration lessons for grades K-12 and taking notes from a live lecture. You also get a premium one year subscription which allows you to stream the seminar videos, some PDF downloads, audio recordings, as well as monthly webinar training.


The other part that accompanies the DVD's is a Seminar and Practicum Workbook which is a 234 page binder that covers the 9 units that are taught to the student. Also in these units you'll find teaching tips, answers to frequently asked questions, student samples for each level as well as other info in the back of the binder. The binder comes with tabs to divide all the units up making it easy to locate what you need.

The other piece of curriculum we received was The Student Writing Intensive: Level B. This includes 5 DVD's in a hard case, 4 of them with the student lessons and one disc being the parent overview.The discs include:

  • Disc 1-Outlines, Summary, Dress-Uo
  • Disc 2-Story Summary, Dress-Up
  • Disc 3- Reference Summary, Paragraph Structures, Sentence Openers
  • Disc -Creative Writing, Sentence Openers

 There is also a student binder that includes 5 tab dividers for their work and handouts to be stored:

  • Models/Sources Checklist
  • Outlines/Compositions
  • Structural Models
  • Style Charts
  • "Banned Words"

The other piece we received was a manila envelope that had the teachers notes and student handouts included. The syllabus and course schedule at the beginning tell you exactly what your student does each day. I LOVED this part otherwise I think I truly would've felt overwhelmed trying to teach this. It also tells you how much of the video lessons to watch and where to stop it at to begin the writing exercise. Also, if you have a special needs learner, there are a lot of notes on how to help adapt this program for them. I put this entire section into my own binder to keep it organized.

How Does It Work?

The program is meant to be covered in either 15 or 30 weeks. We chose to do the 30 week schedule which is what I read that many do. You cover 1 unit roughly ever 4 weeks and you watch the DVD lesson every 2 weeks (each lesson takes 2 weeks to complete) . While the course schedule tells you to do what work to do each day, they do encourage to adjust the schedule to best fit your student.

Before starting the student lesson, the teacher needs to watch the seminar on the TWSS DVD. You can either watch the entire seminar in one sitting or break it up into parts, watching the section that pertains to the lesson your student will soon be covering. This is what I did and by doing it this way, I was staying 2 or so weeks ahead of the lesson my son was working on.

When you first start a lesson, there is a video to watch. They encourage the parent to sit down and watch it with their child so they know exactly how and what was taught to be able to better help them.

From there, we just followed the syllabus and the schedule listed in the teachers manual. In the teachers manual, at the beginning of each lesson, it tells you what they will be working on such as making a keyword outline (which they also provide a list of what these words could be so if you as a teacher aren't sure, there is something to reference.) There are a lot of helpful notes in this section with even references of web links to give further help. After the teachers note, the student handout papers are there and you give them to the student when the schedule says to.

IEW


How We Used It

Let me tell ya, when I opened up the box of curriculum I was overwhelmed by all I saw. I was thankful for the paper laying on top that was a quick start guide. It told you what package to open and what pieces to put in what binder and the order it needed to go in. I did notice that they have an online forum so if we needed support, we could easily go here to ask questions.

Once I had everything in place, I watched part of the TWSS DVD to prepare myself on how to teach my son. Just as a note, you could use this program with just the TWSS portion but I love having curriculum already put together so I don't have to do that so I couldn't imagine not having the Student Writing Intensive on hand as well.

One of my tips is that I used sticky tabs to post on the syllabus page and one on the current lesson page, making it easy to quick go to!

At the beginning of each lesson, my son and I sat down together to watch the lesson and I gave him the handouts as directed. From the very first lesson, my son was encouraged. See, IEW starts out by giving the student a written paragraph and teaches them how to pick out key words called a keyword outline (KWO). They pick out 3 words from each sentence and write them down either using the word or a symbol to represent a word. 3  of the words or symbols are written per line then they eventually rewrite the paragraph in their own words. Other curriculum's we had used would give a subject and expect the student to write about it and that is where my son struggled. He said it made sense on how to write a keyword outline by using something already written out. He spends 2 weeks practicing each lesson by writing several different pieces which helps him with mastery.

There is also a composition checklist that goes along with each written piece he is to complete. This reminds him to make sure his writing includes the things he just learned about in each lesson, to make sure it's double spaced, etc.

The lessons continue to teach more writing skills such as using adverb dress-ups, words they shouldn't use such as "said, thought and went" and using more creative words in place of those, reinforce who-which clauses, writing titles and so much more.

I do think we FINALLY found the writing program that clicks for my son and is something he WANTS to do! This curriculum will also help teach him the skills that he can take over into his other subjects and how to write reports and papers.

I keep the entire curriculum in a tote making it easy to grab when it's time to do writing!

I anticipated this program working well for him so in addition to the products I received to review, I also purchased A Word Write Now which is a thematic thesaurus. I know part of my sons challenge is coming up with creative words so I figured having this at his finger tips would help expand his vocabulary as he writes. I also purchased Portable Walls which is a sturdy fold-out that has key points for each unit that he can look at at a glance for a refresher as he is writing. It also has some word lists as well. My goal in purchasing these 2 items was to make writing easier from him with tools available at his finger tips.

Connect with IEW on:
Facebook
Pinterest
Twitter
IEW Blog

IEW Review
Crew Disclaimer